

Whipped Shortbread Cookies: The Ultimate Melt-in-Your-Mouth Holiday Treat
Step into the delightful world of homemade holiday baking with a recipe that promises pure joy: whipped shortbread cookies. These exquisite treats are renowned for their ethereal lightness and profoundly buttery flavor, quite literally melting in your mouth with every bite. Crafted from just a few simple ingredients, they embody the essence of classic comfort and festive cheer. Forget dense, crumbly shortbread; our whipped version achieves an unparalleled softness and delicate texture that will instantly transport you to cherished holiday memories.

Shortbread, in its many forms, holds a revered place in holiday culinary traditions. It’s that timeless biscuit—rich, buttery, and perfectly sweet without being cloying—that evokes a sense of nostalgia, often reminding us of family gatherings and grandmother’s kitchen. While traditional shortbread is undeniably delicious, whipped shortbread cookies elevate the experience. Their unique preparation method results in an extraordinarily soft texture that truly melts away on your tongue. We’re thrilled to share our tried-and-true recipe, along with all the tips and tricks to ensure your success.
The Irresistible Charm of Whipped Shortbread: What Makes It So Special?
A common question among baking enthusiasts is: “What exactly distinguishes whipped shortbread from its regular counterpart?” It’s a fantastic question with a simple, yet impactful, answer that lies in the technique rather than a drastic change in ingredients.
Both regular shortbread and whipped shortbread rely on the same foundational components: butter, sugar, and flour. However, the magic of whipped shortbread unfolds during the creaming stage. For this delightful variation, the butter and powdered sugar are beaten together for a significantly longer duration – a process affectionately known as “whipping.” This extended beating incorporates a substantial amount of air into the mixture, transforming it into a light, fluffy, and aerated batter. The result is a shortbread cookie that is inherently lighter, more delicate, and incredibly tender in texture.
Unlike some traditional shortbread recipes that can occasionally yield a denser, slightly more crumbly cookie, whipped shortbread boasts an airy, almost cloud-like consistency. This unique quality gives it that coveted melt-in-your-mouth sensation, making it an irresistible treat that stands out during the festive season or any time you crave a delicate indulgence. It’s the subtle difference that makes all the difference, promising a truly memorable buttery experience.

A Journey Through Time: The Rich History of Shortbread
Before we dive deeper into the nuances of making whipped shortbread, let’s appreciate the heritage of this beloved cookie. Shortbread hails from Scotland, with its origins tracing back to medieval times. Initially, it was a type of biscuit made from leftover bread dough, dried out in a low oven. Over time, yeast was replaced with butter, and the dough evolved into the rich, crumbly pastry we know today. Mary, Queen of Scots, is often credited with popularizing shortbread in the 16th century, enjoying a delicate, thin, and crisp variety.
Historically, shortbread was a luxury item, reserved for special occasions like Christmas, Hogmanay (New Year’s Eve), and weddings, largely due to the cost of butter. Its rich, simple flavor profile quickly made it a staple in Scottish households and eventually across the globe. The name “shortbread” refers to its “short” texture, meaning it’s crumbly and tender due to the high fat content from the butter, which inhibits gluten development. While the basic recipe has remained largely unchanged for centuries, variations like our whipped shortbread demonstrate how classic treats can be innovated to offer new delightful experiences while honoring their roots.
Unlocking the Perfect Texture: Key Ingredients Explained
The beauty of whipped shortbread lies in its simplicity, but understanding the role of each ingredient is key to achieving that perfect light, buttery, melt-in-your-mouth quality. Let’s delve into what makes each component essential:
Butter: The Heart of Shortbread
Without a doubt, butter is the star of this show. Its rich flavor forms the very foundation of shortbread. For the best results, always use real unsalted butter. Margarine or butter substitutes simply won’t deliver the same depth of flavor or the desirable texture. The butter must be properly softened—not melted. Softened butter creams beautifully with sugar, allowing for maximum air incorporation, which is crucial for whipped shortbread. Melted butter will cause the cookies to spread excessively and potentially burn, leading to a greasy, tough texture. Aim for butter that gives slightly when pressed, but still holds its shape.
Powdered Sugar & Flour: Sweetness and Structure
Powdered sugar (confectioners’ sugar) is preferred over granulated sugar in whipped shortbread. Its fine texture dissolves more readily into the butter, contributing to the smooth, delicate consistency of the dough and preventing a gritty mouthfeel. As for all-purpose flour, it provides the essential structure. While shortbread is meant to be tender, the flour holds everything together. The ratio of butter to flour is critical for that signature “short” texture.
Cornstarch: The Secret to Delicate Shortbread
This is where the “secret ingredient” truly shines! Adding cornstarch to your shortbread recipe is a game-changer for achieving that exquisitely light and delicate texture. Cornstarch, a pure starch, helps to tenderize the dough by reducing the gluten formation that can lead to tough cookies. It makes the cookies wonderfully tender and crumbly, enhancing their melt-in-your-mouth quality. Do not skip this ingredient if you desire the perfect whipped shortbread.
Vanilla & Salt: Flavor Enhancers
A touch of vanilla extract elevates the entire cookie, complementing the rich butter flavor with its warm, aromatic notes. Always use pure vanilla extract for the best taste. And don’t forget a pinch of salt! While often overlooked, salt plays a vital role in balancing the sweetness and enhancing all the other flavors, bringing out the true essence of the butter.
Mastering Whipped Shortbread: Expert Tips for Flawless Baking
Creating these heavenly whipped shortbread cookies isn’t overly complicated, but the delicate nature of the dough requires a careful touch. Paying attention to these expert tips will prevent common pitfalls and ensure your cookies are perfectly light, tender, and delicious every time.
- Start with the Right Butter: As mentioned, real unsalted butter is non-negotiable for flavor. Ensure it’s softened, but not melted. If it’s too cold, it won’t cream properly; if it’s too warm or melted, it will result in a greasy dough and flat, spreading cookies. Let it sit at room temperature for about an hour before baking.
- Whip It Good: This is the defining step for whipped shortbread. Beat the softened butter and powdered sugar together for at least 5 minutes, or even longer (up to 7-8 minutes), using an electric mixer. You’re looking for a mixture that is significantly lighter in color, incredibly fluffy, and noticeably aerated. This vigorous whipping incorporates air, which is what gives these cookies their signature light texture.
- Embrace Cornstarch: For that truly delicate and tender, melt-in-your-mouth texture, cornstarch is your best friend. It helps to weaken the gluten in the flour, preventing the cookies from becoming tough. Do not substitute it.
- Bake Low and Slow: After extensive testing, baking whipped shortbread at a lower temperature of 300°F (150°C) consistently yields the best results. A higher oven temperature can cause the edges to brown too quickly or burn, and the cookies can dry out. The gentle, lower heat allows the cookies to bake through evenly, resulting in that wonderfully soft and tender interior without over-browning.
- Gentle Hands with Dough: The dough for whipped shortbread is delicate. When forming the cookies, lightly dust your hands with a little cornstarch to prevent sticking. Work quickly and gently to avoid overworking the dough, which can develop gluten and make the cookies tough.
- Skip the Cookie Press (Unless You’re an Expert): While cookie presses can create intricate shapes, they often require a very specific dough consistency. For whipped shortbread, we find that a cookie press can add an unnecessary layer of complexity and a higher chance of the cookies falling apart. Simple hand-rolled balls are often the most effective and least frustrating method.
- The Fork & Sprinkles Touch: After rolling the dough into small balls (about 1 tablespoon in size), gently press the tops down with the tines of a fork. This creates a classic shortbread appearance and helps to ensure even baking. Dip your fork in a bit of cornstarch between cookies to prevent sticking. A scattering of festive sprinkles at this stage adds a beautiful holiday touch!
- Patience with Baking Time: Whipped shortbread cookies often bake for longer than typical cookies due to their thickness and the lower oven temperature. If you form your cookies into approximately 1-tablespoon-sized balls, they will generally take around 14-16 minutes. They should look set on top, but still remain pale in color. Over-baking will lead to dry cookies.
- Troubleshooting Spreading: If your cookies spread too thin while baking, it usually indicates one of two issues: either there wasn’t enough flour in the dough, or your butter was too warm/started to melt. To remedy this, briefly chill your formed dough balls in the refrigerator for 15-30 minutes before baking. This helps solidify the butter, preventing excessive spreading.
- Bake One Sheet at a Time: For optimal and consistent baking, always bake only one cookie sheet at a time, positioning it on the middle rack of your oven. Baking two sheets simultaneously, especially on different racks, can lead to uneven results, with cookies on the lower rack potentially browning too much on the bottom.
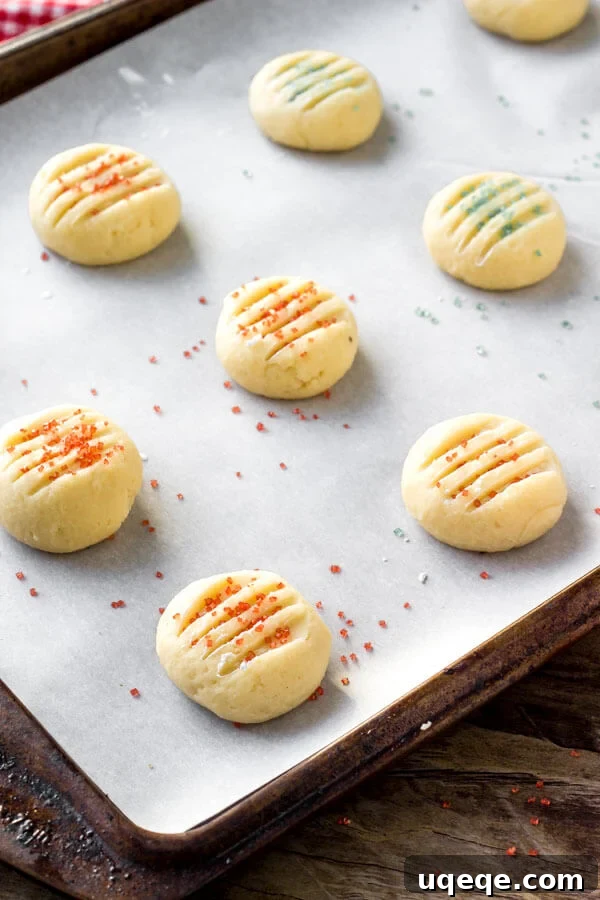
Following these guidelines will ensure your whipped shortbread cookies emerge from the oven perfectly light, tender, and incredibly delicious. They are an undeniable classic, perfect for showcasing during the holidays or simply enjoying as a delicate, buttery treat any day of the year. The addition of a few colorful sprinkles not only enhances their festive appeal but also adds a touch of playful charm, making them a welcome addition to any holiday cookie platter.
Beyond the Basics: Creative Variations and Serving Suggestions
While classic whipped shortbread is utterly delightful on its own, its simple canvas makes it perfect for creative variations. Experiment with these ideas to add your personal touch:
- Citrus Zest: Incorporate 1-2 teaspoons of finely grated lemon, orange, or lime zest into the dough along with the vanilla for a bright, refreshing flavor.
- Chocolate Drizzle: Once the cookies are completely cooled, melt some dark, milk, or white chocolate and drizzle it decoratively over the tops.
- Nutty Crunch: Finely chop pecans, walnuts, or almonds and gently fold them into the dough, or press a single nut into the center of each cookie before baking.
- Spiced Delight: Add 1/2 teaspoon of ground cinnamon, cardamom, or a pinch of nutmeg to the dry ingredients for a warm, aromatic twist, especially fitting for the holidays.
- Lavender Infusion: For an elegant floral note, add a small amount of culinary lavender to the butter during the whipping stage.
Whipped shortbread cookies are incredibly versatile for serving. They are perfect with a cup of tea or coffee, a delightful addition to a dessert platter, or charmingly packaged as homemade gifts. Their delicate nature also makes them a wonderful accompaniment to fruit salads or scoops of ice cream.
Troubleshooting Common Shortbread Challenges
Even with a simple recipe, baking can sometimes present challenges. Here are solutions to common issues you might encounter:
- Cookies Spreading Too Thin: As mentioned, this is often due to butter being too warm or insufficient flour. Ensure butter is softened, not melted, and consider chilling the dough for 15-30 minutes before baking to firm up the butter. You can also carefully add an extra tablespoon or two of flour if the dough feels excessively soft.
- Tough Cookies: This usually happens from overworking the dough once the flour is added. Overworking develops gluten, leading to a tougher texture. Mix the flour in just until combined, then stop. The whipping stage is for aeration, not after flour is added.
- Crumbling Dough: If your dough is too crumbly and won’t hold together when forming balls, it might be too dry. This could be due to slightly less butter or too much flour. Try adding a tiny splash (1/2 teaspoon at a time) of milk or cream and mix gently until it just comes together.
- Edges Burning/Over-Browning: This is a sign the oven temperature is too high. Ensure your oven thermometer is accurate and stick to the recommended 300°F. Baking one sheet at a time on the middle rack also helps.
- Cookies Sticking to the Pan: Always use parchment paper or silicone baking mats. They prevent sticking and make cleanup a breeze. Lightly dusting your fork with cornstarch before pressing cookies also helps.
Make-Ahead and Storage Solutions for Whipped Shortbread
These exquisite cookies are perfect for making ahead, making your holiday baking much less stressful. Proper storage ensures they retain their delicate texture and delicious flavor.
To Freeze the Dough:
Preparing the dough in advance is a fantastic time-saver. First, form the cookie dough into individual balls as directed in the recipe. Place these dough balls onto a baking sheet lined with parchment paper, ensuring they don’t touch each other. Freeze until the dough balls are firm, typically 1-2 hours. Once solid, transfer the frozen dough balls to an airtight freezer-safe container or a heavy-duty freezer bag. Label with the date and freeze for up to 3 months. When you’re ready to bake, you can bake them directly from frozen; simply add an additional 2-4 minutes to the specified baking time.
To Freeze Baked Cookies:
If you prefer to bake all your cookies at once, they freeze beautifully after baking. Allow the whipped shortbread cookies to cool completely on a wire rack before freezing. Once fully cooled, arrange them in a single layer in an airtight freezer-safe container. If stacking, place a piece of parchment paper between layers to prevent them from sticking together or breaking. Freeze for up to 2-3 months. To thaw, simply remove the desired number of cookies from the freezer and place them on a cookie sheet or a plate lined with paper towel (to absorb any condensation). Thaw them in the refrigerator overnight, or at room temperature for a few hours, until soft and ready to enjoy.

Ready to Bake? Our Easy Whipped Shortbread Cookie Recipe
Here’s the full recipe for these incredible Whipped Shortbread Cookies. Get ready to bake a batch of buttery, light-as-air treats that will become a new holiday favorite!

Average Rating: 4.72 from 64 votes
Whipped Shortbread Cookies
By: Fiona Dowling
Whipped shortbread cookies are light as air with a delicious buttery flavor. They melt in your mouth because they’re so soft, and only require a few simple ingredients.
Prep Time: 15 mins | Cook Time: 15 mins | Total Time: 29 mins | Servings: 24 cookies
Enjoyed this recipe? Share it with friends or family!
Pin Recipe
Rate Recipe
Print Recipe
Ingredients
- 1 cup unsalted butter, softened
- 1/2 cup powdered sugar
- 1 1/2 cups all-purpose flour
- 1/4 cup cornstarch
- 1/4 teaspoon salt
- 1 teaspoon vanilla extract
- Sprinkles (optional, for decoration)
Instructions
- Preheat your oven to 300°F (150°C). Line several cookie sheets with parchment paper or silicone baking mats.
- In a large mixing bowl, using an electric mixer, beat the softened butter and powdered sugar together on medium-high speed until the mixture is very fluffy, light in color, and well aerated. This should take at least 5-7 minutes. Scrape down the sides of the bowl as needed.
- Reduce the mixer speed to low. Gradually add the all-purpose flour, cornstarch, salt, and vanilla extract to the whipped butter mixture. Mix only until just combined and a soft dough forms. Be careful not to overmix.
- Lightly dust your hands with cornstarch to prevent sticking. Scoop the dough and roll it into small balls, approximately 2 teaspoons to 1 tablespoon in size.
- Place the dough balls about 1 inch apart on the prepared cookie sheets. Gently flatten the top of each cookie with the tines of a fork (dip the fork in cornstarch to prevent sticking). If desired, add a few sprinkles to the top of each cookie for a festive touch.
- Bake for 14-16 minutes, or until the tops of the cookies look set and are still pale in color. Do not wait for them to brown.
- Remove from the oven and let the cookies cool on the baking sheets for about 5 minutes before carefully transferring them to a wire rack to cool completely.
Like this recipe? We’d love for you to rate it and share your comments below!
More Holiday Cookie Delights to Explore
If you’ve enjoyed baking these delightful whipped shortbread cookies, you’ll surely love exploring other classic and festive treats for your holiday baking repertoire. Expand your cookie collection with these equally delicious recipes:
- Holiday Sprinkle Cookies: Bright, colorful, and perfect for a festive spread.
- Toffee Icebox Cookies: A convenient make-ahead option with a delightful toffee crunch.
- Extra Soft Sugar Cookies: Melt-in-your-mouth sugar cookies topped with dreamy frosting.
Happy baking, and enjoy creating wonderful memories with these timeless treats!