
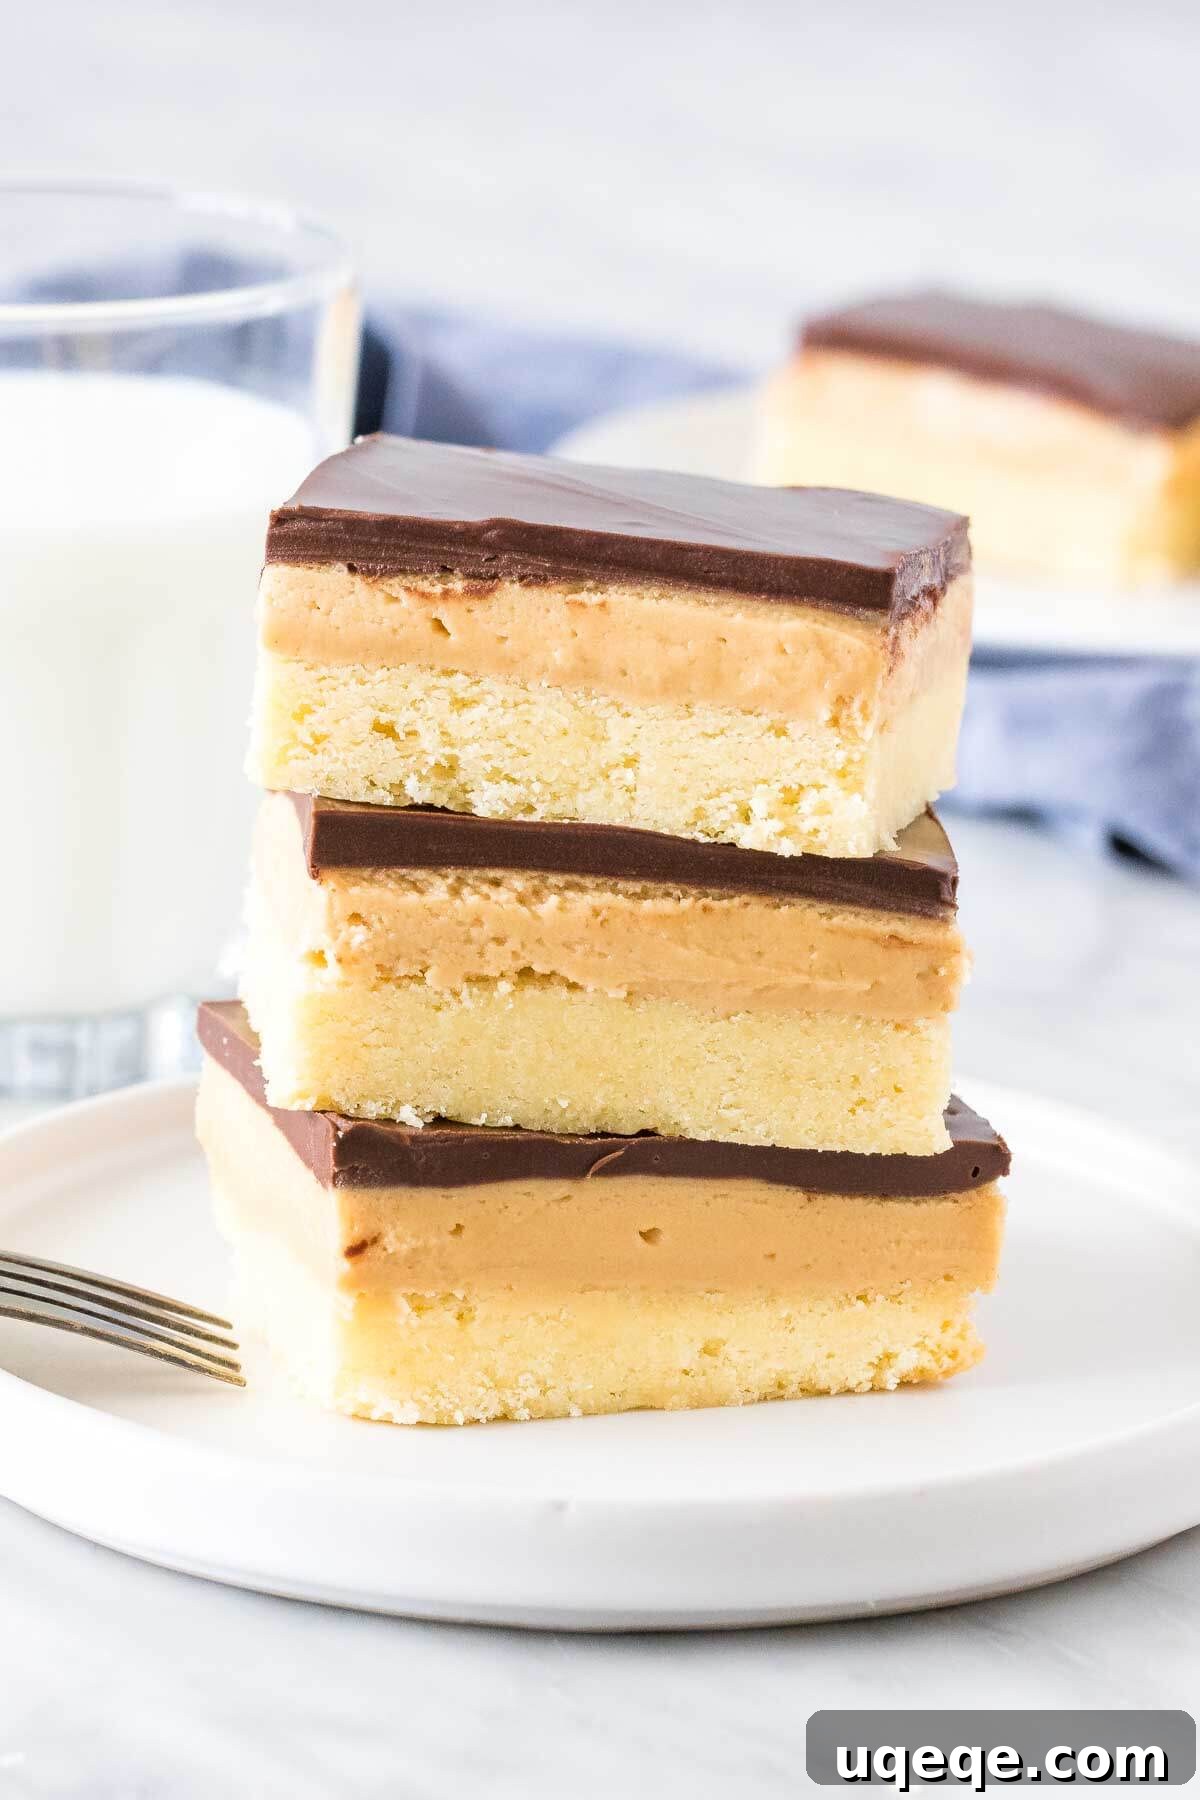
These **Peanut Butter Shortbread Bars** are an absolute dream come true for anyone who adores the classic combination of peanut butter and chocolate. Imagine the buttery, melt-in-your-mouth texture of a traditional shortbread cookie, topped with a lusciously creamy peanut butter filling that tastes remarkably like the center of your favorite peanut butter cup, and crowned with a generous layer of rich chocolate. This delightful dessert offers an irresistible symphony of flavors and textures, making it truly impossible to resist.
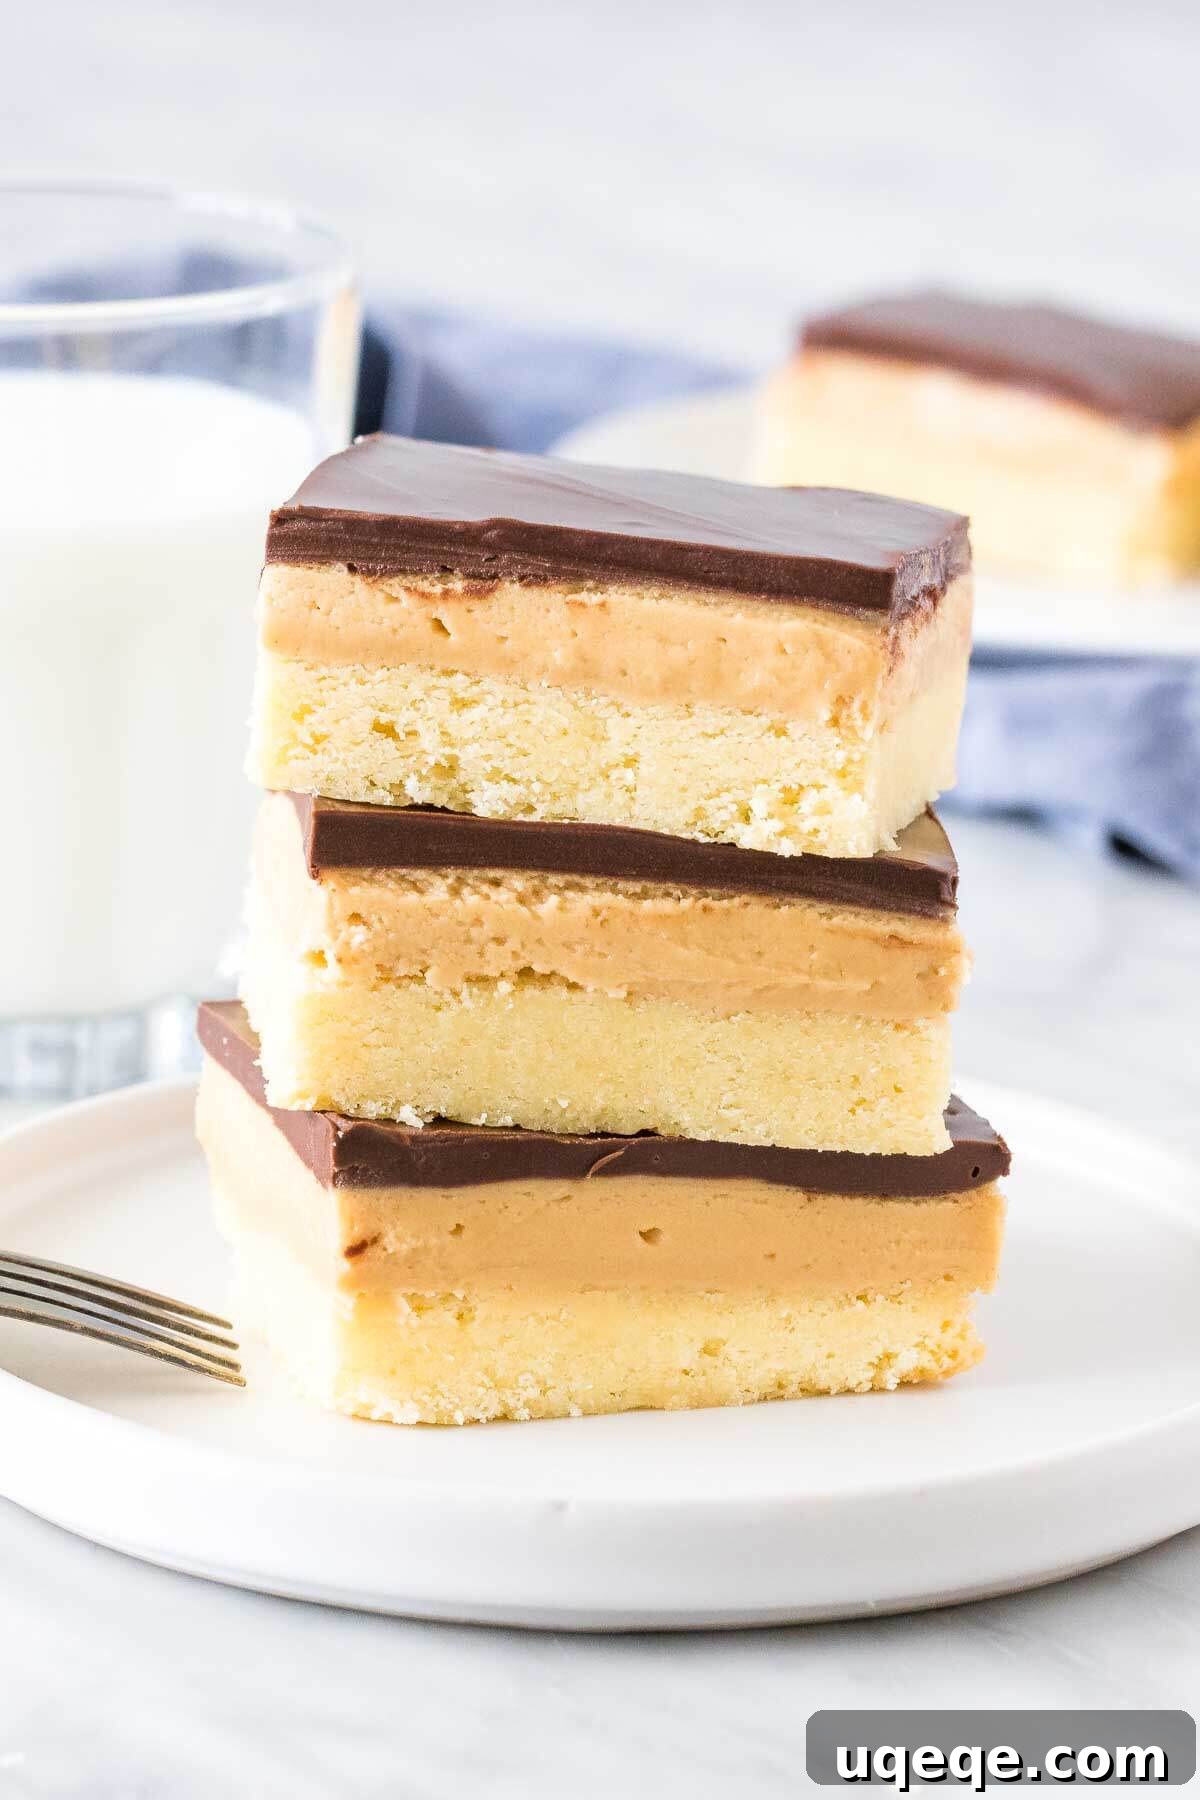
Often compared to the renowned Millionaire’s Shortbread, these bars take that concept and elevate it with a delightful twist. Instead of a thick, gooey caramel layer, we introduce a sweetened, velvety peanut butter core that stands out as the true star of the show. It’s a familiar indulgence, but with a unique, nutty character that makes these bars a standout treat. While the recipe involves three distinct layers, don’t let that deter you. Each step is straightforward, and even novice bakers will find this recipe remarkably achievable, resulting in a show-stopping dessert that tastes incredibly gourmet.
Indulge in 3-Layer Peanut Butter Shortbread Bars: A Step-by-Step Guide
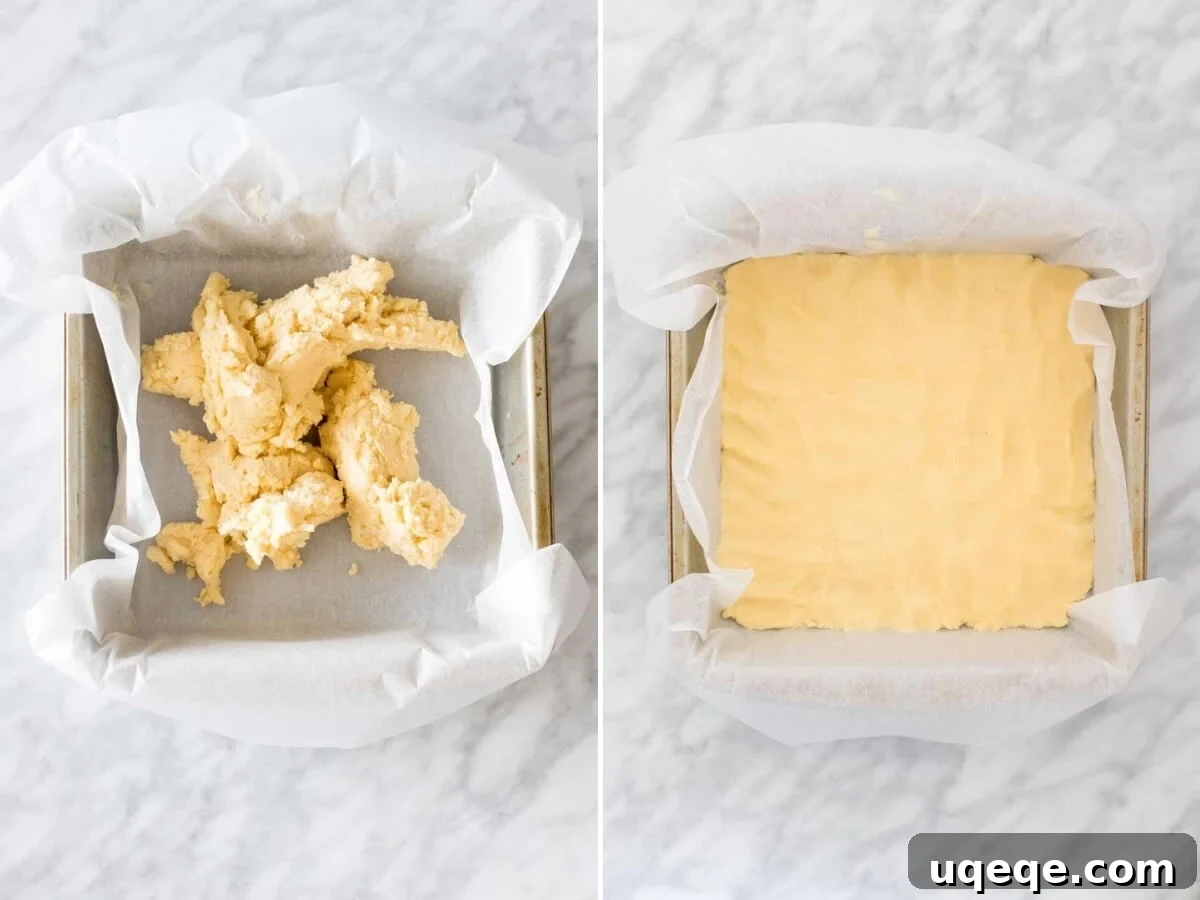
Creating these exquisite peanut butter shortbread bars begins with a perfectly crafted foundation: the shortbread base. This layer is wonderfully simple, requiring just a handful of essential ingredients: softened unsalted butter, granulated sugar, all-purpose flour, a touch of cornstarch, and a pinch of salt. The secret to its tender, crumbly texture lies in the cornstarch, which contributes to a softer, more delicate shortbread. If you’re out of cornstarch, a slight increase in flour can be a substitute, though the cornstarch is highly recommended for that signature melt-in-your-mouth quality. The shortbread is designed to be subtly sweet, acting as the ideal counterpoint to the richer layers above. Once the dough is mixed, it’s pressed firmly into the bottom of a parchment-lined 8×8 inch (20×20 cm) baking pan, ensuring an even layer for consistent baking. After a quick bake of 22-25 minutes, the shortbread emerges golden and fragrant, ready for its next delicious phase.
Crafting the Creamy Peanut Butter Filling
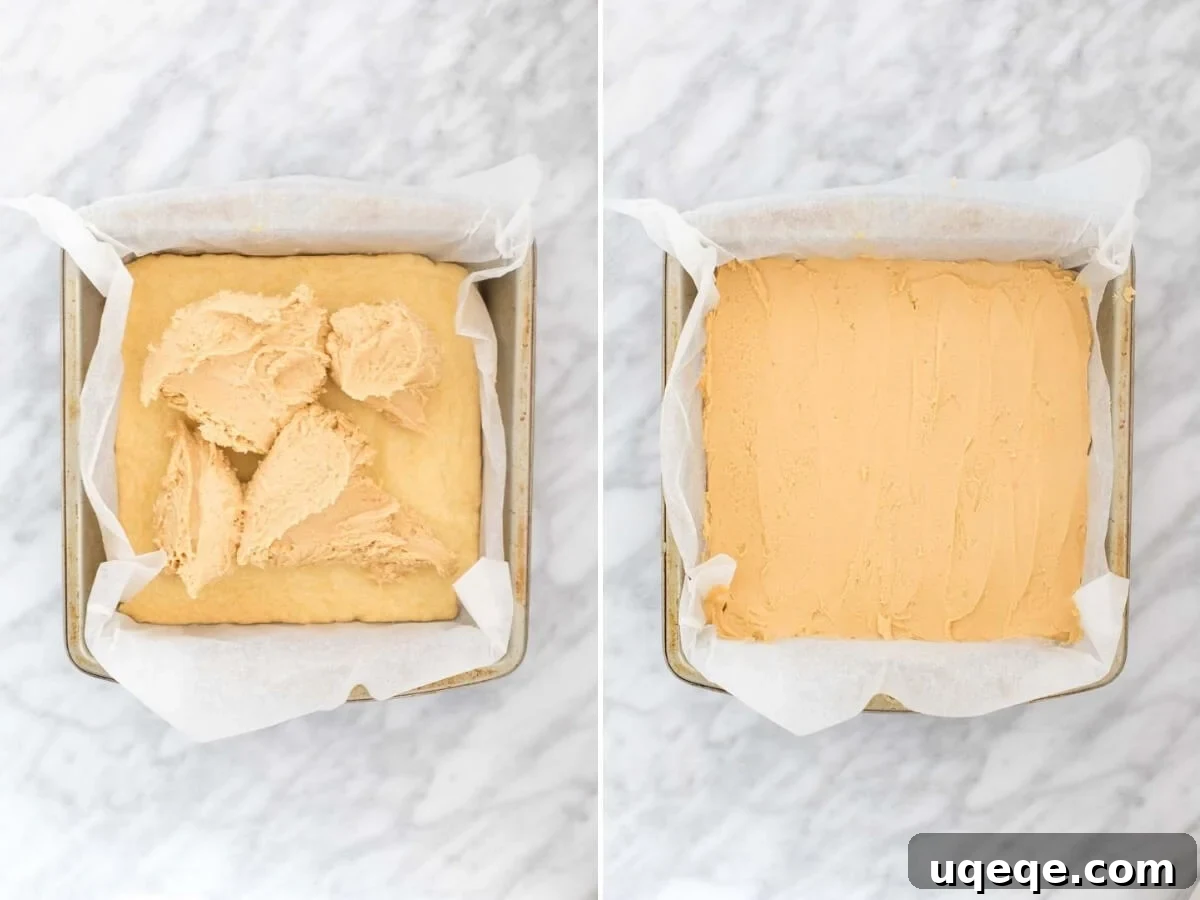
After the shortbread base has fully baked and cooled to room temperature – a crucial step for preventing layers from melding – it’s time to introduce the star player: the creamy peanut butter center. This irresistible filling mirrors the luscious interior of a peanut butter cup, offering a rich, sweet, and undeniably satisfying experience. It’s a thick, decadent blend of softened butter, smooth peanut butter, fragrant vanilla extract, and powdered sugar. Unlike a lighter peanut butter frosting, this filling boasts a dense, fudgy consistency, making it substantial enough to hold its own between the cookie and chocolate.
The key to achieving this perfect texture and flavor is using a smooth, stabilized peanut butter, such as popular brands like Skippy, Jif, or Kraft. Avoid natural peanut butter varieties, as their oil separation can lead to a less stable and potentially greasy filling. Once combined, the peanut butter mixture is spread evenly over the cooled shortbread, creating a smooth, inviting layer. A brief chill in the refrigerator while you prepare the chocolate topping helps to firm up this layer, ensuring clean cuts and a beautiful presentation later on.
The Perfect Chocolate Topping
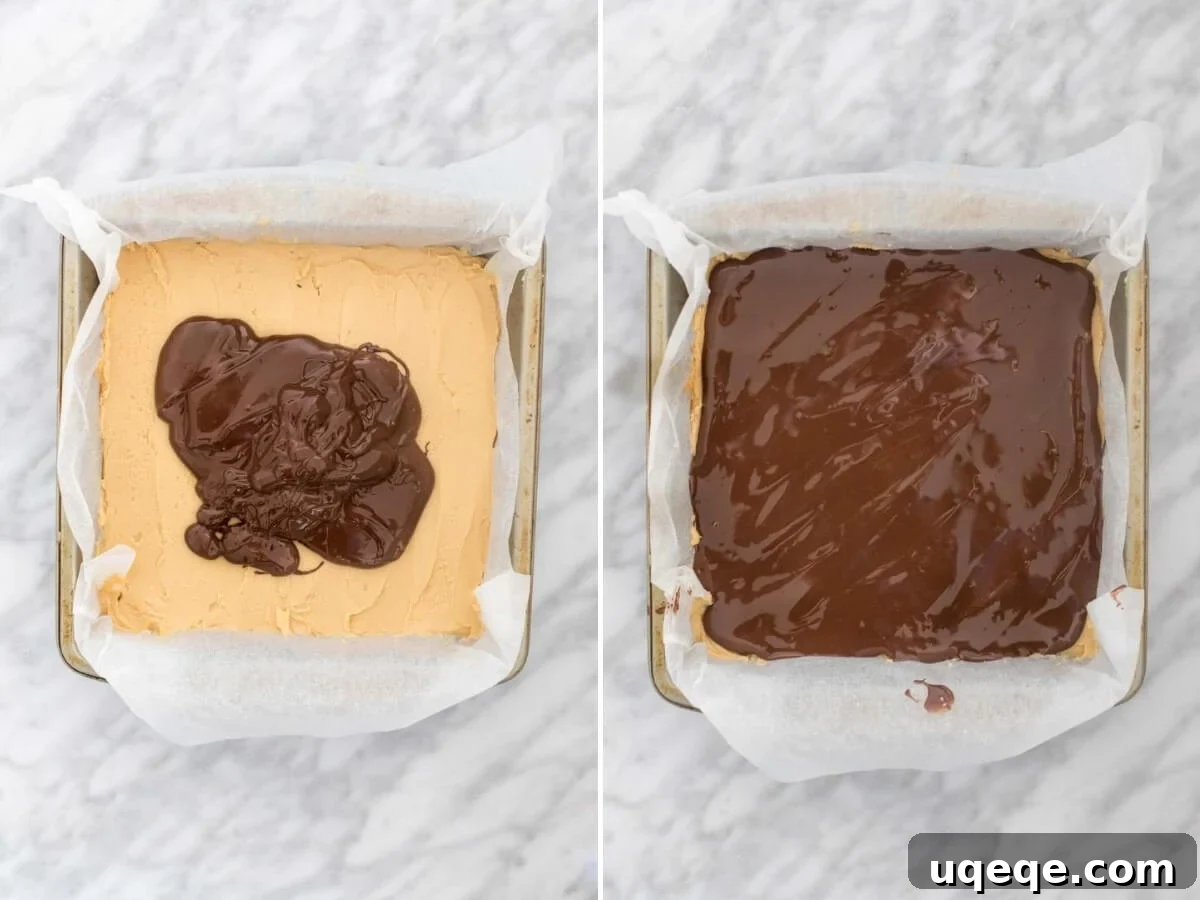
No peanut butter bar is complete without a rich, glossy chocolate topping. This final layer is incredibly straightforward yet essential for tying all the flavors together. It consists of your favorite chocolate, melted down with a small amount of unsalted butter. The butter isn’t just for flavor; it helps achieve a smooth, pourable consistency and contributes to a beautiful sheen, making the bars easier to slice without the chocolate cracking.
You have the freedom to choose your preferred type of chocolate. A blend of milk chocolate and dark chocolate, as suggested (4 oz milk chocolate and 2 oz dark chocolate), offers a balanced sweetness and depth of flavor. However, feel free to experiment with all milk chocolate for a sweeter profile, or all dark chocolate for a more intense cocoa experience. Semi-sweet chocolate chips also work wonderfully.
When melting the chocolate, particular attention to technique is crucial. If using a microwave, always use **medium power** and melt in short bursts (e.g., 30-45 seconds initially, then 15-20 second intervals). Stir thoroughly after each interval. High power can quickly overheat and burn chocolate, causing it to seize, become lumpy, or develop a grainy texture. Alternatively, you can use a double boiler method, gently melting the chocolate over simmering water for a more controlled process. Once smooth and free of lumps, pour the melted chocolate evenly over the chilled peanut butter layer, spreading it to the edges for a clean finish. Pop the pan back into the refrigerator to allow the chocolate to set completely.
Pro Tip: For Flawless Slicing
Achieving clean, professional-looking slices can sometimes be a challenge with chocolate-topped bars. Here’s a professional secret: when the chocolate topping is approximately 75% hardened (it will still appear slightly glossy but will no longer be wet to the touch), use a thin, sharp knife (like a paring knife) to gently score the chocolate layer where you intend to cut the bars. This initial scoring creates a guide and helps prevent the chocolate from cracking or shattering when you make the final cuts after it has fully set. Return the bars to the fridge to allow the chocolate to harden completely before slicing.
A Dessert That Delights the Senses
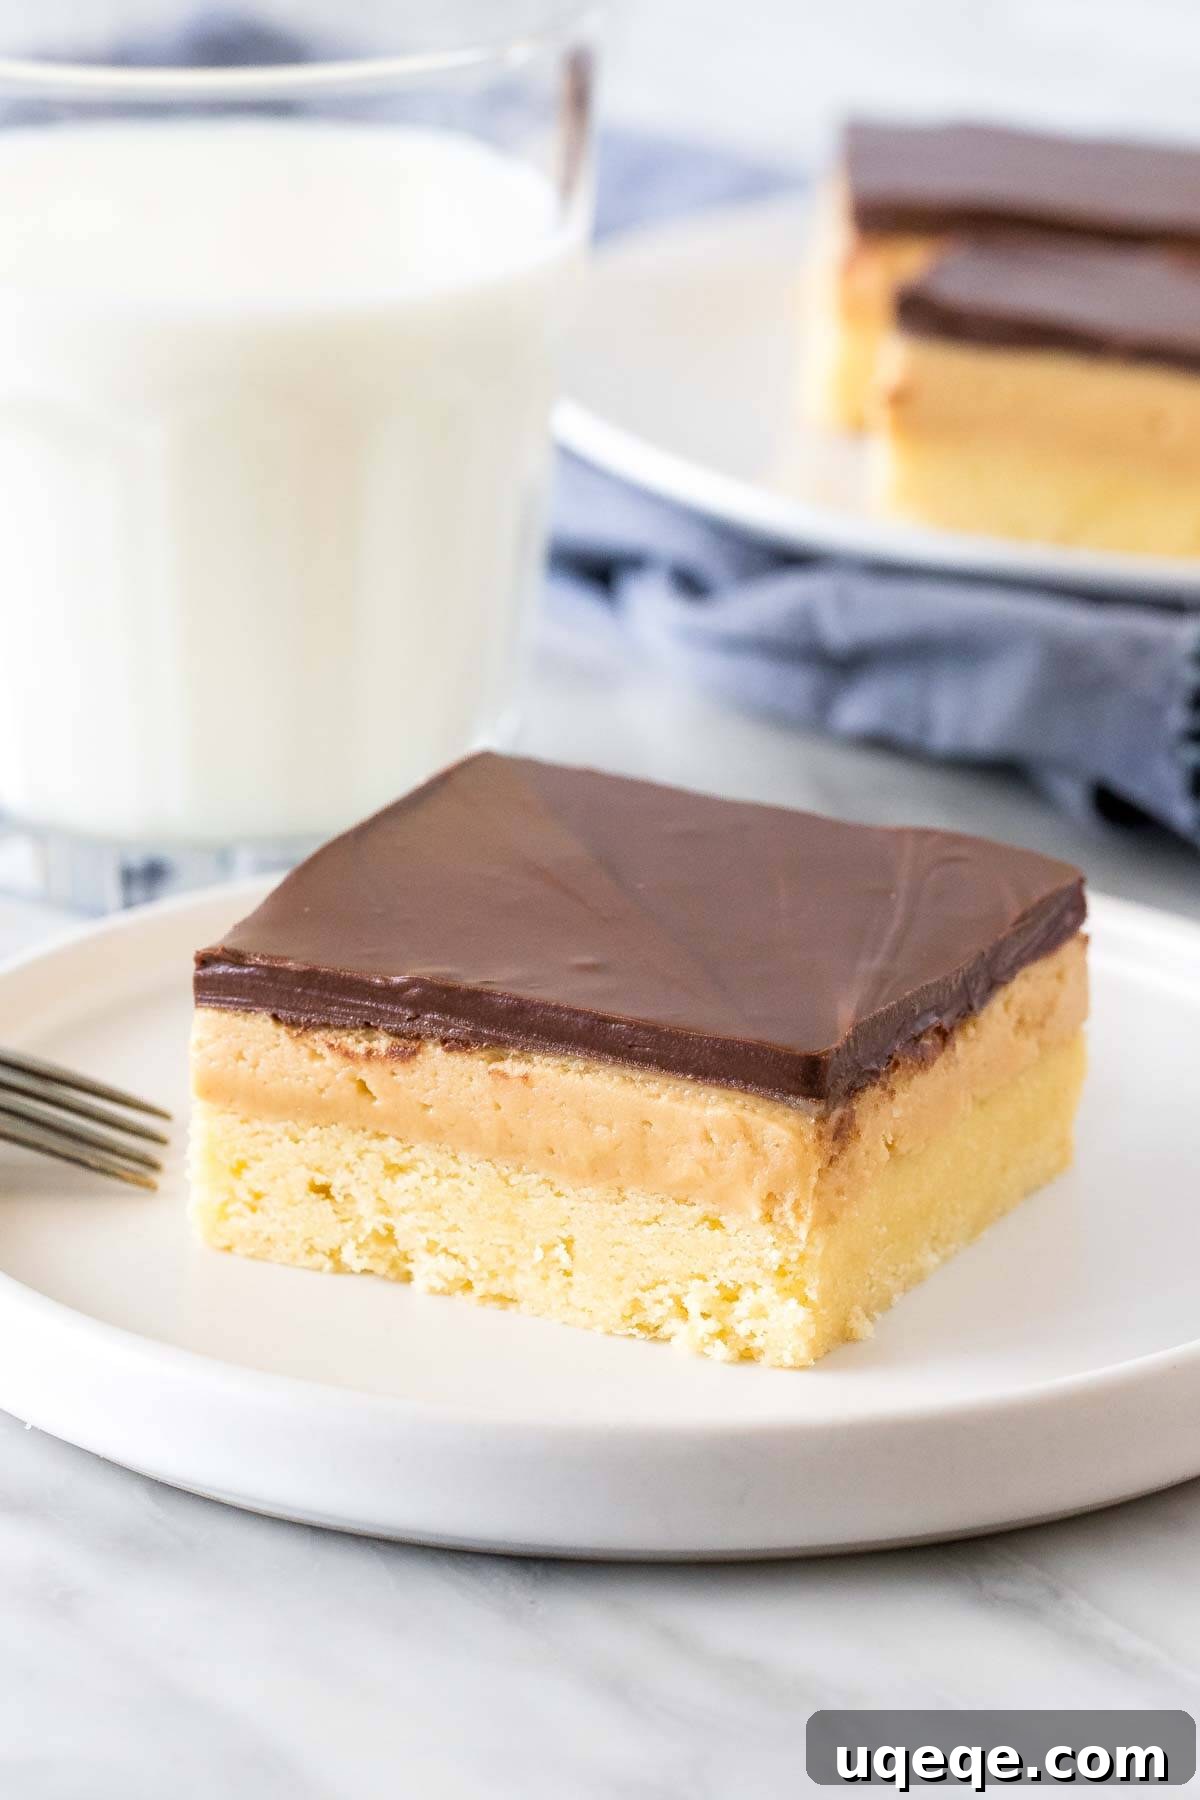
These Peanut Butter Shortbread Bars are a testament to how simple ingredients can create extraordinary flavor. They strike a perfect balance, being rich and satisfying without ever becoming overly sweet. Each bite delivers the crisp tenderness of the shortbread, the comforting creaminess of the peanut butter, and the luxurious snap of the chocolate. They truly embody the beloved flavors of a peanut butter cup, elevated by the homemade charm of a buttery shortbread cookie. Easy to make and universally adored, these bars are the ultimate indulgence for any peanut butter enthusiast, perfect for sharing at gatherings or enjoying as a delightful personal treat.
Whether you’re looking for a dessert to impress guests, a satisfying bake for a weekend treat, or simply craving the timeless combination of peanut butter and chocolate, these shortbread bars are your answer. Their layered construction makes them visually appealing, while their harmonious flavors ensure they disappear quickly from any plate. Pair them with a cold glass of milk for the ultimate nostalgic experience.
More Peanut Butter Delights to Explore
If these irresistible peanut butter shortbread bars have ignited your passion for all things peanut butter, you’ll certainly want to explore these other fantastic recipes that celebrate this beloved ingredient:
- Peanut Butter Pie: A dreamy, no-bake dessert with a velvety smooth filling.
- Peanut Butter Cup Cookies: Chewy cookies loaded with mini peanut butter cups.
- Chocolate Peanut Butter Fudge: A decadent and easy-to-make fudge, also known as Buckeye Fudge.
Peanut Butter Shortbread Bars
Fiona Dowling
30
22
2
3
9
slices
Rate Recipe
Print Recipe
Equipment
-
8×8 inch (20×20 cm) baking pan
Ingredients
Shortbread Base
- 2/3 cup unsalted butter, softened
- 1/3 cup caster sugar, aka white sugar
- 1 1/3 cup all-purpose flour, aka plain flour
- 1 tablespoon cornstarch
- Pinch salt
Peanut Butter Layer
- 3 tablespoons unsalted butter, softened
- 1 cup smooth peanut butter*
- 1 teaspoon vanilla extract
- 1 1/3 cup powdered sugar
Chocolate Topping
- 6 oz chocolate*, I typically use 4 oz milk chocolate and 2 oz dark chocolate
- 1 tablespoon unsalted butter
Instructions
Shortbread Base
-
Preheat the oven to 325°F (160°C) and line an 8×8 inch (20×20 cm) pan with parchment paper, leaving an overhang around the edges for easy removal. You can also use aluminum foil and lightly grease it.
-
In a medium bowl, beat together the softened butter and sugar until they are well combined and slightly creamy.
-
Gradually mix in the flour and cornstarch. Mix only until just combined; be careful not to overmix, as this can make the shortbread tough.
-
Press the mixture firmly and evenly into the bottom of the prepared pan, ensuring the surface is flat.
-
Bake in the preheated oven for 22-25 minutes, or until the top appears completely set and the edges are just beginning to turn a light golden brown.
-
Remove the pan from the oven and allow the shortbread to cool completely in the pan, which typically takes at least 1 hour. This is crucial before adding the next layer.
Peanut Butter Layer
-
In a medium bowl, beat together the softened butter and smooth peanut butter until combined and creamy.
-
Add the vanilla extract and powdered sugar. Start mixing on low speed to incorporate the powdered sugar, then increase to medium speed until the mixture is thick, smooth, and slightly crumbly.
-
Evenly press the peanut butter mixture on top of the fully cooled shortbread base. Use the back of a spoon or an offset spatula to spread it flat and smooth.
-
Place the bars in the refrigerator to chill and firm up while you prepare the chocolate topping.
Chocolate Topping
-
Chop your chosen chocolate into very small, uniform pieces. Place the chopped chocolate and the tablespoon of unsalted butter (cut into a few small pieces) into a heatproof, microwave-safe bowl.
-
Microwave on medium power (important: do not use high power, as it can burn the chocolate and make it grainy) for 45 seconds. Remove and stir well. Continue microwaving in 15-20 second intervals, stirring thoroughly after each, until the chocolate is completely smooth and melted.
-
Pour the smooth, melted chocolate over the chilled peanut butter layer. Quickly spread it evenly across the top, creating a smooth, glossy finish.
-
Return the pan with the bars to the refrigerator and chill for at least 1-2 hours, or until the chocolate topping is completely hardened.
Slicing & Serving
-
When the chocolate is about 75% hardened (it will look slightly glossy but not wet, and will feel firm to the touch), gently score the top of the bars with a thin, sharp knife (such as a paring knife) where you plan to slice them. This helps prevent the chocolate from cracking when fully hard. Return to the fridge to finish hardening.
-
Once the chocolate is fully set, lift the bars out of the pan using the parchment paper overhang and place them on a cutting board. Use a sharp, non-serrated knife (you can warm the knife slightly with hot water and wipe it dry for super clean cuts) to slice the bars into 9 equal pieces. Serve and enjoy!
Notes
- Make sure to use a smooth, stabilized peanut butter (e.g., Skippy, Jif, Kraft). Natural, whipped, or homemade peanut butter is not recommended for this recipe, as it can separate and cause the filling to leak oil, affecting the bar’s texture and stability.
- Feel free to use your favorite type of chocolate for the topping – milk, dark, or semi-sweet all work wonderfully. 6 oz of chocolate is roughly equivalent to 1 cup of chocolate chips. While chocolate chips can be used, chopped bar chocolate typically melts more smoothly and is less likely to become grainy.
- This recipe can be easily doubled to make a larger batch. If you double the recipe, use a 9×13 inch (23×33 cm) pan. The bars may be slightly thicker, and the baking time for the shortbread layer will increase to approximately 25-30 minutes. Adjust cooling and chilling times accordingly.
- Store these delicious bars in an airtight container. They will keep well at room temperature for up to 4 days, or in the refrigerator for up to 1 week. If your kitchen tends to be warm, storing them in the fridge is advisable to maintain their structure.
- The provided nutrition information is an estimate only, based on 1 slice, assuming the recipe yields 9 equal slices. Nutritional values may vary depending on specific brands and ingredients used.
Nutrition
Calories:
595
kcal
Carbohydrates:
56
g
Protein:
10
g
Fat:
40
g
Saturated Fat:
19
g
Cholesterol:
50
mg
Sodium:
138
mg
Potassium:
265
mg
Fiber:
3
g
Sugar:
36
g
Vitamin A:
576
IU
Calcium:
25
mg
Iron:
2
mg
Like this recipe? Rate and comment below!