
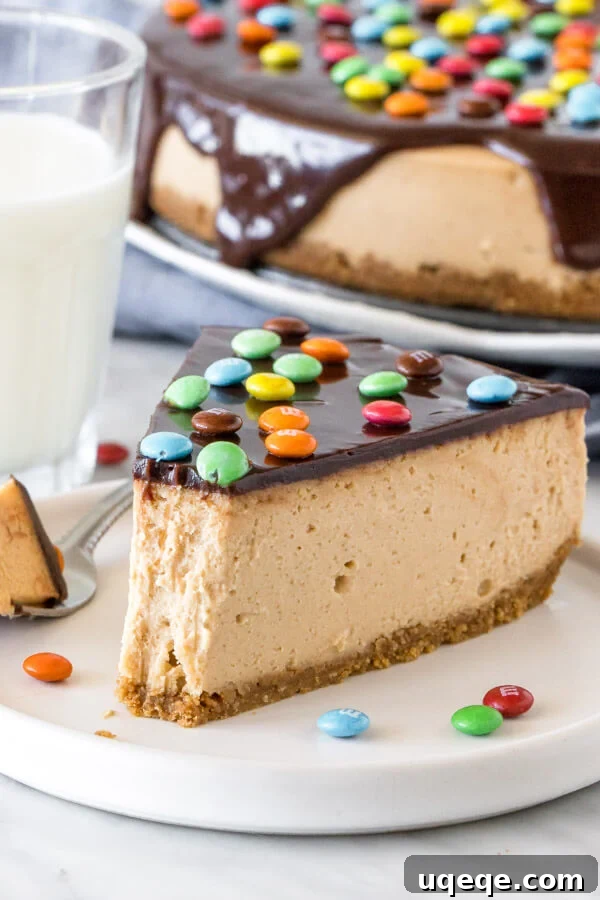
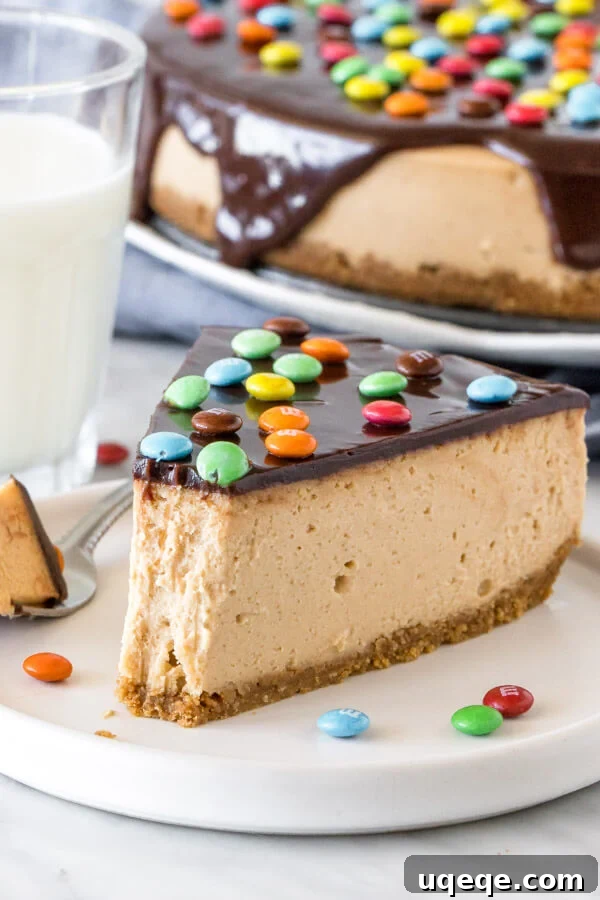
This ultimate Monster Cookie Cheesecake is a dream come true for dessert lovers, masterfully combining the beloved flavors of classic monster cookies into a show-stopping, extra creamy cheesecake. Imagine a symphony of textures and tastes: a wonderfully crunchy oatmeal peanut butter cookie crust, a velvety smooth peanut butter cheesecake filling, a decadent layer of rich chocolate ganache, and a vibrant sprinkle of M&M candies. It’s a salty-sweet masterpiece that will leave everyone asking for more.
What Makes a Monster Cookie Cheesecake So Irresistible?
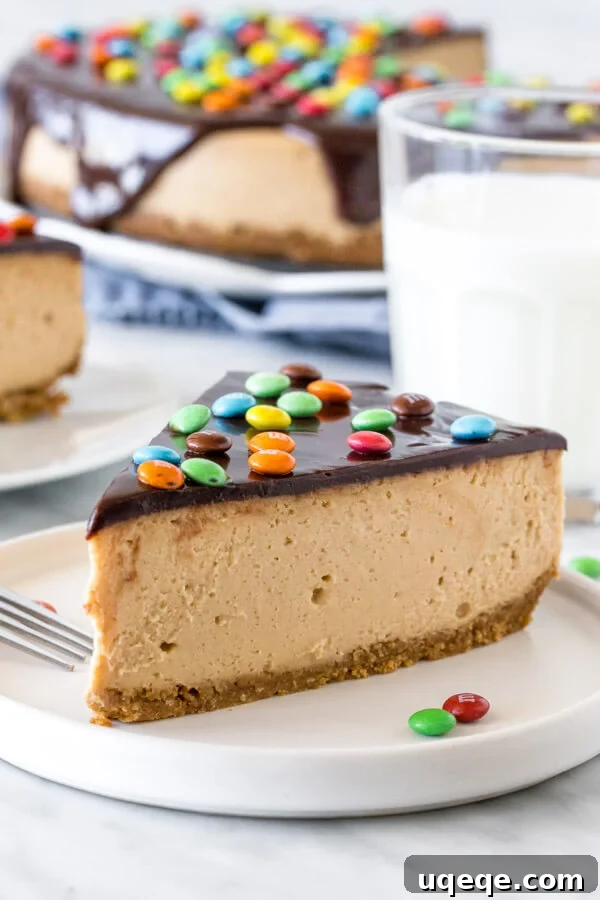
If you’ve ever indulged in monster cookies, you know their magic. These delightful treats are typically soft, chewy oatmeal cookies packed with creamy peanut butter, melted chocolate chips, and colorful M&M candies. They offer an explosion of flavor and texture that’s incredibly difficult to resist, blending all the best cookie elements into one perfect bite.
This Monster Cookie Cheesecake takes that irresistible charm and elevates it to a whole new level. It transforms the classic monster cookie profile into a sophisticated, creamy cheesecake experience that’s truly over-the-top and promises a massive payoff for your efforts. Each component is carefully crafted to complement the others, creating a dessert that’s more than just a cheesecake – it’s an experience.
Here’s a glimpse into the layers of deliciousness you can expect:
- A robust and crunchy **oatmeal peanut butter cookie crust**, providing the perfect textural contrast.
- A rich and silky **peanut butter cheesecake filling**, the heart of this indulgent dessert.
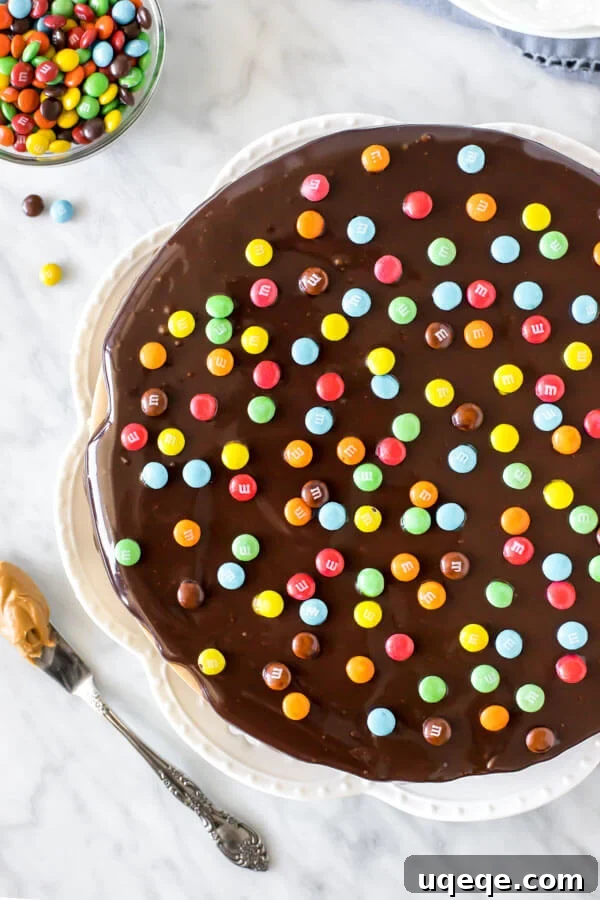
- A glossy, luxurious **chocolate ganache topping**, adding a layer of intense chocolate flavor.
- And, of course, a generous scattering of colorful **M&M candies** for that iconic monster cookie appeal and a delightful crunch.
Essential Tips for Crafting the Perfect Baked Cheesecake
While this Monster Cookie Cheesecake recipe is designed to be approachable, achieving that perfectly creamy texture and crack-free top requires attention to detail. Since cheesecake ingredients can be a bit of an investment, it’s crucial to follow these tips meticulously to ensure your baking efforts are rewarded with a flawless dessert.
- Read the Recipe Thoroughly: Before you even start, take the time to read through the entire recipe. Understanding each step and why it’s important will prevent common cheesecake pitfalls. Familiarize yourself with the general principles of cheesecake making for a deeper understanding of the science involved.
- Choose the Right Cream Cheese: Always opt for full-fat, brick-style cream cheese. Avoid “lite,” spreadable, or whipped varieties as they contain more water and less fat, which will compromise the cheesecake’s proper consistency, structure, and luxurious creaminess. High-quality cream cheese is the foundation of a great cheesecake.
- Room Temperature Ingredients are Key: Ensure your cream cheese, eggs, and sour cream are at room temperature before you begin mixing. Cold ingredients do not emulsify properly, leading to a lumpy batter and an unevenly textured cheesecake. Take them out of the refrigerator at least 30 minutes, or even an hour, before you plan to start baking. This allows them to blend smoothly and incorporate air evenly.
- Select the Correct Peanut Butter: For the best results in your cheesecake filling, use smooth, processed peanut butter (like Jif or Skippy). Natural or homemade peanut butter tends to separate and release oil, which can cause the cheesecake batter to break or become oily, resulting in an undesirable texture. The stability of processed peanut butter is essential for a creamy, consistent filling.
-
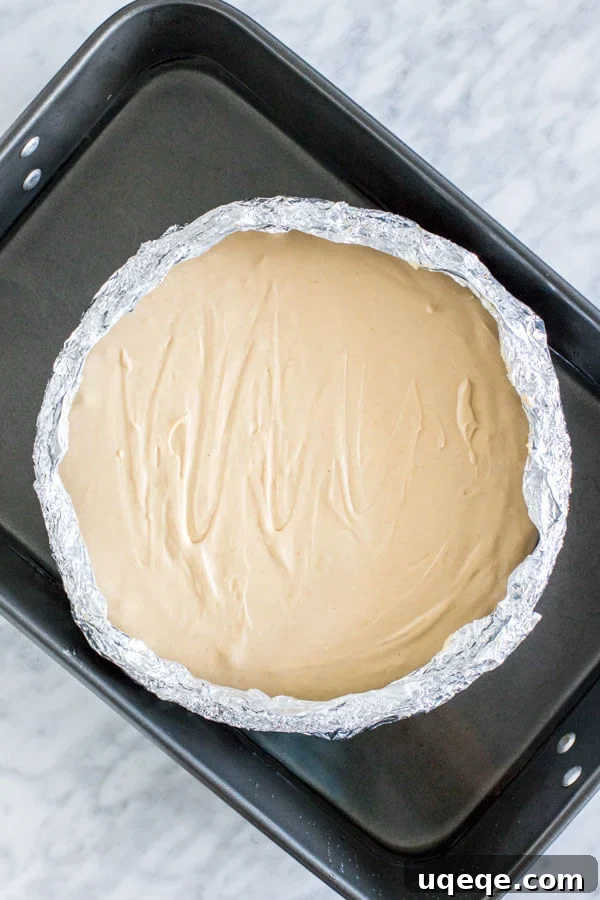
Master the Water Bath Technique: Baking your cheesecake in a water bath (bain-marie) is arguably the most critical step for a professional-looking, crack-free cheesecake. This method provides gentle, even heat and introduces steam into the oven, keeping the cheesecake moist and preventing the top from drying out and cracking.
- Pan Preparation: Tightly wrap the outside of your 9-inch springform pan with heavy-duty aluminum foil at least 3-4 times. Ensure all seams are completely covered to prevent any water from seeping into the crust during baking.
- Setup: After preparing your crust and filling, carefully place the foil-wrapped springform pan in the center of a large roasting pan.
- Adding Water: Pour about 1/2 to 1 inch of hot water into the roasting pan, ensuring the water level does not come too high up the sides of your springform pan. Then, carefully transfer the entire roasting pan, with the cheesecake nestled inside, into the preheated oven.
- Slow and Patient Cooling: Once baked, do not rush the cooling process. Allow the cheesecake to cool slowly within the water bath until both the water and the cheesecake reach room temperature. This gradual cooling prevents drastic temperature changes that can cause cracks. After reaching room temperature, cover the springform pan (still containing the cheesecake) and transfer it to the refrigerator.
- Thorough Chilling for Optimal Set and Flavor: Chilling is non-negotiable for cheesecake perfection. Allow the cheesecake to chill in the refrigerator for at least 6 hours, or ideally overnight. This extended chilling period allows the cheesecake to set properly, resulting in a firm yet creamy texture, and significantly enhances both the flavor and overall richness. Patience is a virtue when it comes to cheesecake!
- M&M Candies Timing: To maintain their vibrant color and prevent them from bleeding into the chocolate ganache or cheesecake, sprinkle the M&M candies on top of the cheesecake right before serving. This ensures a beautiful presentation.
Delicious Variations & Creative Substitutions
While the classic Monster Cookie Cheesecake recipe is phenomenal, don’t hesitate to experiment with these exciting variations and substitutions to tailor it to your taste or dietary needs.
-
Alternative Crust Options: Instead of the Nutter Butter cookie crust, you can easily create a different flavor profile.
- Oreo Cookie Crust: For a rich chocolate base, use about 26 Oreo cookies (including the cream filling) finely crushed, mixed with 4 tablespoons of melted unsalted butter. Press into the pan and bake as directed.
- Graham Cracker Crust: A traditional graham cracker crust also works wonderfully, providing a lighter, buttery foundation.
- No-Bake Monster Cookie Cheesecake: If you’re short on time or prefer a no-bake option, you can still enjoy the monster cookie experience. Prepare the crust and the chocolate topping exactly as described in this recipe. For the filling, substitute the baked peanut butter cheesecake with the creamy, effortless filling from a no-bake peanut butter cheesecake recipe. This offers a quicker, lighter alternative without compromising on flavor.
-
Additions to the Cheesecake Batter: Elevate your cheesecake by incorporating extra mix-ins into the peanut butter filling.
- Mini Chocolate Chips: Stir in about 1 cup of mini chocolate chips into the cheesecake batter. Mini chips are preferred over regular-sized ones because they are lighter and less likely to sink to the bottom of the pan during baking, ensuring an even distribution of chocolatey goodness.
- Mini M&M Candies: For an extra burst of color and crunch within the filling, you could add 1 cup of mini M&M candies. However, be mindful that the color from the M&Ms might bleed into the cheesecake batter during baking, which, while not affecting taste, might alter the visual appeal.
- Ganache Chocolate Choice: While semi-sweet chocolate is recommended for the ganache, feel free to adjust it to your preference. Dark chocolate (up to 50% cocoa) can be used for a more intense chocolate flavor, or milk chocolate for a sweeter, milder topping.
Indulge Your Cravings: More Peanut Butter & M&M Delights
If you’ve fallen in love with the combination of rich peanut butter and colorful M&M candies in this cheesecake, you’ll be thrilled to discover more recipes that celebrate these fantastic flavors. These treats are perfect for any occasion and are sure to satisfy your sweet tooth:
- Monster Cookie Bars: All the goodness of monster cookies in an easy-to-make bar form, perfect for sharing or meal prep.
- M&M Cookies: Classic soft and chewy cookies bursting with colorful M&Ms, a timeless favorite for all ages.
- Reese’s Peanut Butter Cup Cookies: A decadent cookie recipe featuring everyone’s favorite peanut butter cups, a true indulgence.
Making this Monster Cookie Cheesecake is more than just baking; it’s creating a memorable dessert that combines familiar, comforting flavors with a sophisticated presentation. Whether you’re a seasoned baker or new to cheesecake, following these detailed instructions and tips will help you achieve a truly outstanding result. Enjoy the process, and get ready to impress with this incredible salty-sweet, extra creamy treat!
Monster Cookie Cheesecake Recipe
By: Fiona Dowling
This salty-sweet, extra creamy monster cookie cheesecake encompasses everything you love about Monster cookies – but in classic cheesecake form. With a crunchy oatmeal cookie crust, peanut butter cheesecake filling, chocolate ganache on top, and tons of M&M candies.
Prep Time: 40 mins
Cook Time: 1 hr
Chilling Time: 6 hrs
Total Time: 7 hrs 40 mins
Servings: 14 pieces
Ingredients
Nutter Butter Crust
- 20 Nutter Butter Cookies*, wafers and filling
- 5 tablespoons unsalted butter, melted
Peanut Butter Cheesecake
- 20 oz cream cheese*, use full-fat, brick style
- 1/2 cup white sugar
- 1/2 cup brown sugar
- 1 cup peanut butter*
- 1 cup sour cream*
- 3 large eggs*
- Hot water, for the waterbath
Chocolate Ganache
- 6 oz semi-sweet chocolate*, finely chopped
- 1/2 cup heavy/whipping cream
- 1/4 cup mini M&Ms
Instructions
- Preheat the oven to 325°F (160°C).
- Wrap the outside (bottom and sides) of a 9-inch springform pan with aluminum foil at least 3 times so that all the seams are covered.
Crust
- Add the Nutter Butter cookies (wafers and filling) to a food processor and blitz until fine crumbs. Alternatively, place them in a ziploc bag and crush with a rolling pin.
- Mix the cookie crumbs with the melted butter and press firmly into the bottom and slightly up the sides of the springform pan to create a slight lip.
- Bake in the preheated oven for 10 minutes.
Cheesecake Filling
- In a very large bowl, beat the room temperature cream cheese until completely smooth and free of lumps.
- Beat in the white sugar, brown sugar, and room temperature peanut butter until well combined.
- Beat in the room temperature sour cream until smooth.
- Beat in the room temperature eggs one at a time, mixing until just combined after each addition. Be careful not to overmix.
- Place the cheesecake crust (with the pan still wrapped in aluminum foil) inside a large roasting pan.
- Pour or spoon the cheesecake filling evenly on top of the baked crust and gently smooth the top with a spatula.
- Carefully pour hot water into the roasting pan, ensuring there’s about 1/2 inch of water surrounding the springform pan.
- Place the roasting pan with the cheesecake inside into the preheated oven, and bake for 60-70 minutes, or until the top looks just set and there’s still a slight wobble in the middle when gently nudged. Oven times can vary, so I recommend checking at 50 minutes.
- Remove the cheesecake (still inside the roasting pan) from the oven and allow it to cool gradually until the cheesecake and water are at room temperature. Cover the springform pan and chill the cheesecake in the fridge for at least 6 hours (or preferably overnight). Keep the cheesecake in the springform pan during chilling.
Chocolate Topping
- Chop the semi-sweet chocolate into very small, uniform pieces and place them in a heatproof bowl.
- Heat the heavy/whipping cream until it’s almost boiling. You can do this in the microwave or in a small saucepan over medium heat, stirring gently.
- Pour the hot cream over the chopped chocolate and let it sit undisturbed for 2 minutes to allow the chocolate to melt. Then, whisk until the ganache is completely smooth and glossy.
- Remove the chilled cheesecake from the fridge and carefully unclamp the sides of the springform pan.
- Pour the chocolate ganache evenly over the top of the cheesecake, allowing some of it to elegantly drip over the sides.
- If not serving immediately, place the cheesecake back in the fridge to allow the ganache to set slightly.
- Just before serving, generously sprinkle the top with mini M&M candies for color and crunch.
Notes
- If Nutter Butter cookies are unavailable, you can substitute with 24 Oreo cookies (wafers and filling) and 5 tablespoons of unsalted melted butter for the crust.
- For a smooth and uniform cheesecake, ensure that the cream cheese, sour cream, and eggs are all at room temperature before you begin mixing.
- Always use smooth, processed peanut butter. Natural or homemade peanut butter can cause separation or lumps in the cheesecake batter due to its oil content.
- Semi-sweet chocolate for the ganache can be substituted. Dark chocolate (up to 50% cocoa) can be used for a richer flavor, or milk chocolate for a sweeter ganache.
- Store leftover cheesecake covered in the refrigerator. It can be kept for up to 4 days. Please note that the colors from M&Ms might sometimes bleed when stored in the fridge.
- Nutrition information provided is an estimate based on one slice, assuming the cheesecake is cut into 14 equal pieces.
Nutrition Information
Calories: 506kcal, Carbohydrates: 30g, Protein: 10g, Fat: 40g, Saturated Fat: 20g, Cholesterol: 117mg, Sodium: 253mg, Potassium: 299mg, Fiber: 2g, Sugar: 25g, Vitamin A: 968IU, Vitamin C: 1mg, Calcium: 97mg, Iron: 2mg