
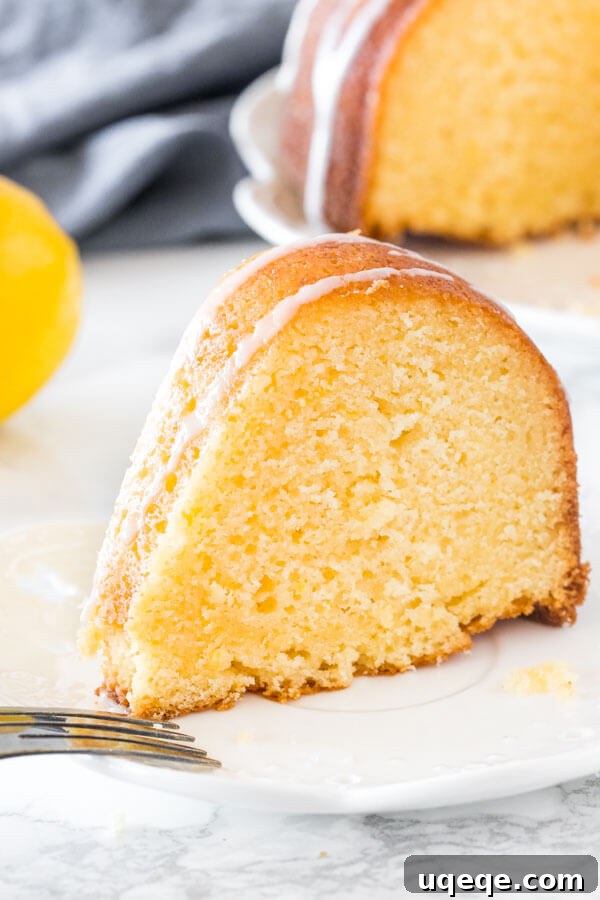
This made-from-scratch lemon bundt cake is the epitome of citrus dessert perfection – remarkably soft, wonderfully moist, and exquisitely tender, bursting with a vibrant, fresh lemon flavor. Drizzled generously with a simple yet elegant lemon glaze, this bundt cake is not just a treat for the taste buds but also a stunning centerpiece that’s sure to impress everyone who takes a bite.
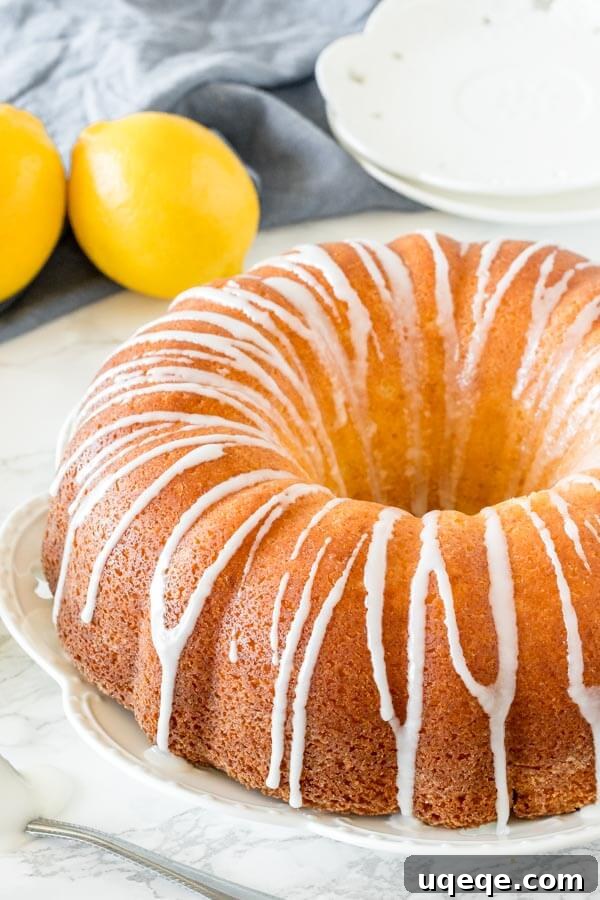
The Ultimate Lemon Bundt Cake: A Zesty Delight
For true lemon lovers, there’s nothing quite like the bright, invigorating taste of a perfectly baked lemon cake. This recipe delivers just that – a simple, elegant, and incredibly flavorful lemon bundt cake that captures the essence of fresh lemons in every single crumb. It stands apart from a traditional lemon pound cake, offering a lighter, more tender texture that melts in your mouth, while still being robust enough to hold its beautiful bundt shape. The secret lies in a careful balance of ingredients, ensuring deep lemon flavor from both zest and juice, and a crumb so moist it barely needs a topping. However, a sweet, tangy lemon glaze is the ideal finishing touch, enhancing its citrus notes and adding a touch of classic sophistication. If you’re feeling adventurous, a rich cream cheese frosting can also transform this cake into an even more decadent experience.
Crafting the Perfect Lemon Cake Batter: The Key to Moist Perfection
Achieving a cake with a fine crumb and moist texture is paramount, especially when baking in a decorative bundt pan. This lemon bundt cake recipe utilizes the classic creaming method, a technique that incorporates air into the butter and sugar, resulting in a lighter, more tender structure compared to denser pound cakes. While we want it tender, it also needs to be sturdy enough to release cleanly from the intricate bundt pan design.
Prepping Your Lemons for Maximum Flavor
The journey to an extraordinary lemon cake begins with fresh, aromatic lemons. You’ll need about 4-6 medium to large lemons in total for both the cake and the accompanying glaze. **A crucial tip: always zest your lemons before you juice them!** Zesting a whole lemon is significantly easier and more efficient than trying to zest a juiced, softened one. And a non-negotiable rule for truly vibrant flavor: **always use freshly squeezed lemon juice.** Bottled lemon juice, while convenient, simply cannot replicate the bright, authentic zest and tartness that fresh lemons provide. The difference in taste is profound and truly makes this cake shine.
Mixing the Dry and Wet Foundations
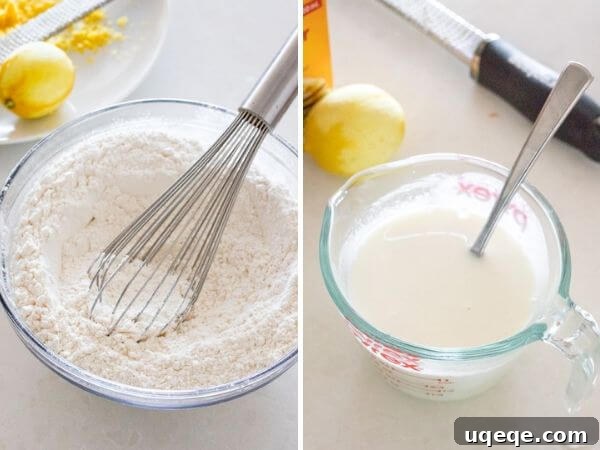
With your lemons ready, it’s time to assemble the batter’s core components. In a medium bowl, combine your dry ingredients: all-purpose flour, baking powder, baking soda, and a pinch of salt. I highly recommend sifting the flour first to eliminate any lumps and ensure a super smooth batter. After sifting, a quick whisk of all the dry ingredients ensures that the leavening agents – baking powder and baking soda – are evenly distributed, leading to a uniform rise and texture throughout the cake.
Concurrently, in a separate liquid measuring cup, whisk together the wet ingredients that contribute heavily to the cake’s tenderness and moisture: sour cream, buttermilk, and your freshly squeezed lemon juice. The harmonious blend of **sour cream and buttermilk is a game-changer**, providing an unmatched level of richness and a wonderfully soft, moist crumb that keeps the cake tasting fresh for days. Don’t worry if there are a few tiny lumps in this mixture; they will smooth out as you incorporate them into the main batter.
The Creaming Method: Building the Batter
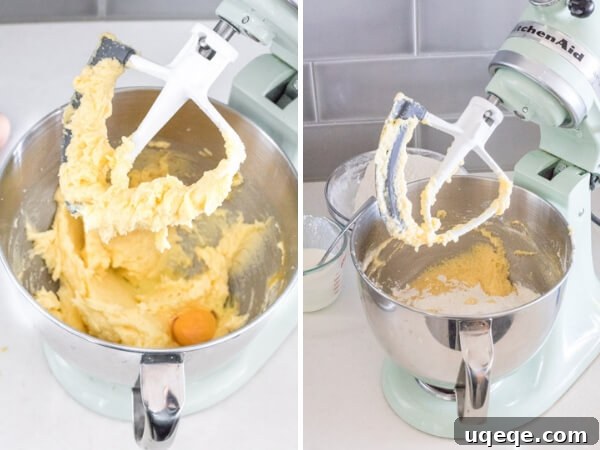
Now for the heart of the cake batter. In a very large bowl, using an electric mixer, you’ll beat together the softened unsalted butter, granulated sugar, and your fresh lemon zest. This step, known as creaming, is vital. You want to beat them until the mixture is light, fluffy, and pale yellow, which usually takes about 2-4 minutes. This process incorporates air, creating tiny pockets that expand during baking, contributing to the cake’s tender texture.
Next, add the vanilla extract, then incorporate the eggs one at a time, beating well after each addition. **A critical note for success: ensure your eggs are at room temperature.** Room temperature eggs emulsify much better with the butter and sugar, creating a smoother, more homogenous batter and preventing overmixing, which can lead to a tough cake. The image below on the left illustrates the incorporation of eggs.
Finally, with the mixer on low speed, begin adding the dry ingredients, alternating with the buttermilk mixture. Start by beating in about 1/3 of the flour mixture, followed by about 1/3 of the sour cream and buttermilk mixture. Repeat this process, ending with the dry ingredients. Alternating these additions allows the batter to come together smoothly and evenly, ensuring a uniform crumb and preventing the gluten from developing too much, which can also result in a dry cake. Scrape down the sides of the bowl as needed to ensure everything is fully combined. The photo on the right below demonstrates this alternating addition method.
Baking Your Beautiful Bundt
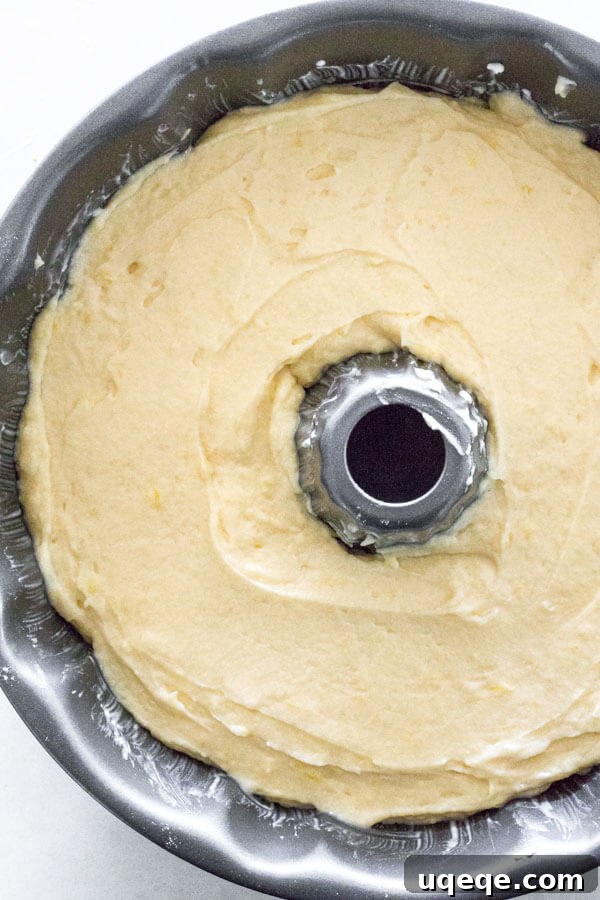
Once your luscious lemon batter is prepared, it’s time to spoon it into your carefully prepared bundt pan. Ensuring your bundt pan is properly greased and floured is key to a clean release and preserving the cake’s intricate design. Spread the batter smooth on top to ensure even baking. The baking time will vary slightly depending on the size of your bundt pan; a standard 10-inch bundt pan typically requires 55-65 minutes, while a smaller 12-cup bundt pan may bake a bit faster. Always rely on the toothpick test: insert a toothpick into the center of the cake; if it comes out clean, your cake is perfectly baked.
Creating the Silky Lemon Glaze
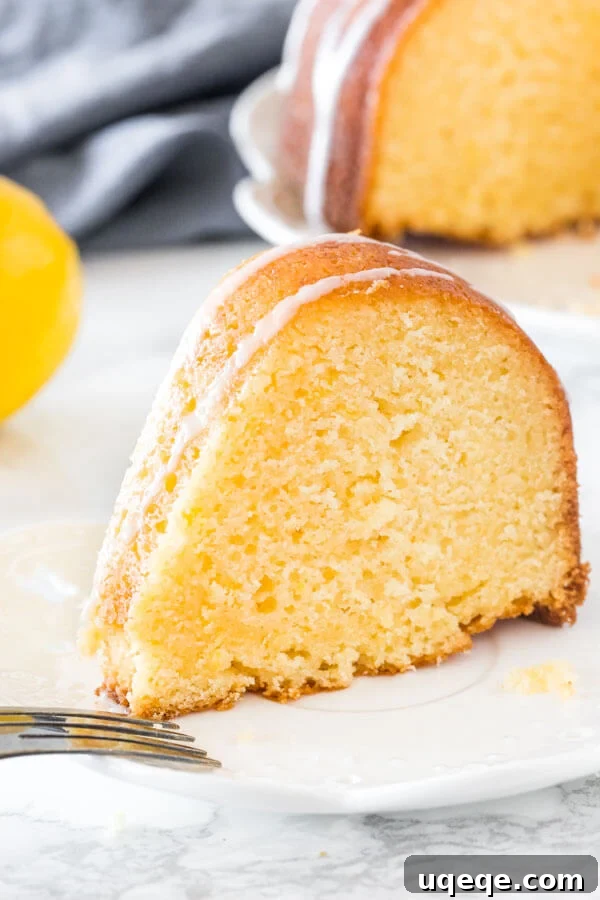
The lemon glaze is the perfect crown for this beautiful bundt cake – simple, sweet, and bursting with additional lemon flavor. It’s a straightforward mixture of fresh lemon juice and sifted powdered sugar. The goal is a glaze that’s opaque (not transparent) but still thin enough to elegantly drizzle over the cooled cake, creating delicate cascades down its fluted sides. If your glaze is too thick, add a tiny bit more lemon juice; if it’s too thin, whisk in a little more powdered sugar until you reach the desired consistency. Once the cake has cooled completely, drizzle the glaze evenly over the top, letting it set slightly before slicing and serving.
Inspiring Variations for Your Lemon Bundt Cake
While this classic lemon bundt cake is undeniably delicious on its own, its versatility allows for exciting variations that can transform it for any occasion or craving. Here are a few popular ideas to customize your next bake:
- Lemon Blueberry Bundt Cake: For a delightful fruity twist, gently fold 1 1/2 cups of fresh blueberries into the cake batter just before spooning it into the bundt pan. To prevent the berries from sinking to the bottom, toss them lightly in 2 teaspoons of all-purpose flour first. The baking time will remain similar. If using frozen blueberries, do not thaw them; simply toss them in flour and fold them in.
- Lemon Raspberry Bundt Cake: Similar to the blueberry variation, use 1 1/4 cups of fresh raspberries. Handle them very gently as they are more delicate. Toss them lightly in flour before folding into the batter.
- Cream Cheese Frosting Extravaganza: For those who love a richer topping, forgo the simple glaze and frost the entire cake with a luscious cream cheese frosting. You can find a fantastic recipe for cream cheese frosting here. To perfectly complement the cake’s citrus profile, I highly recommend adding 1-2 teaspoons of fresh lemon juice to the frosting recipe for an extra hint of lemon tang.
- Fresh Strawberry Sauce & Whipped Cream: For a summery dessert experience, serve slices of the plain (unglazed) lemon bundt cake with a generous spoonful of fresh strawberry sauce and a dollop of homemade whipped cream. The sweetness of the strawberries and the light cream create a beautiful contrast with the lemon.
- Simply Dusted with Powdered Sugar: For an understated yet elegant presentation, simply dust the cooled cake generously with powdered sugar instead of a glaze. This highlights the cake’s golden exterior and delicate texture.
Serving, Storage, and Expert Tips for Your Lemon Bundt Cake
Once your stunning lemon bundt cake is baked and glazed, it’s ready to be the star of your dessert table. Serve it slightly warm or at room temperature, perhaps with a cup of tea or coffee. It’s truly a versatile dessert, perfect for brunch, afternoon tea, or as a sweet ending to any meal.
Storage Best Practices
To keep your lemon bundt cake tasting its best, store any leftovers in an airtight container at room temperature for up to 4 days. The cake’s inherent moisture from the sour cream and buttermilk helps it stay fresh and delicious. For longer storage, this cake also freezes beautifully.
Freezing Instructions
If you plan to freeze your cake, bake it as directed but **do not apply the glaze**. Allow the cake to cool completely to room temperature. Once cooled, wrap the cake tightly in plastic wrap, at least twice, ensuring no air can get in. Then, place the wrapped cake in a large freezer-friendly container or heavy-duty freezer bag to protect it from freezer burn. It can be frozen for up to 3 months. When you’re ready to enjoy it, thaw the cake overnight in the refrigerator. Bring it to room temperature before glazing and serving for the best texture and flavor.
Expert Tips for Bundt Cake Success
- Don’t Skimp on Greasing and Flour: Bundt pans, especially those with intricate designs, require thorough greasing and flouring to prevent sticking. Use a baking spray with flour, or apply softened butter generously into every crevice, then dust with flour, tapping out the excess.
- Room Temperature Ingredients are Non-Negotiable: As mentioned, this is crucial for a smooth, emulsified batter and tender cake. Plan ahead and take your butter, eggs, sour cream, and buttermilk out of the fridge at least 30 minutes before you start baking.
- Do Not Overmix: Once you start incorporating the dry and wet ingredients, mix only until just combined. Overmixing develops gluten, leading to a tough, dry cake.
- Cool Properly: Allow the cake to cool in the pan for the recommended time (typically 10-30 minutes, depending on the recipe) before inverting. This allows the cake to set and firm up, preventing it from breaking when removed. Over-cooling in the pan, however, can cause it to stick.
- Invest in a Good Bundt Pan: A heavy-gauge, non-stick bundt pan will yield the best results for even baking and easy release.
This lemon bundt cake is more than just a recipe; it’s an invitation to experience the joy of baking from scratch and sharing a truly memorable dessert. Its bright flavor and moist crumb make it an instant favorite, ensuring it will be a recipe you return to again and again. So, gather your fresh lemons and get ready to bake a masterpiece!
For more delightful lemon desserts, explore these other favorites:
- Lemon Cupcakes
- No Bake Lemon Cheesecake
- Lemon Brownies
- Lemon Poppy Seed Loaf
★
★
★
☆
Lemon Bundt Cake
Fiona Dowling
20 mins
55 mins
12 pieces
Rate Recipe
Print Recipe
Ingredients
Lemon Bundt Cake
- 3 cups all-purpose flour, sifted
- 1 1/2 teaspoons baking powder
- 1/2 teaspoon baking soda
- 1/2 teaspoon salt
- 1/4 cup sour cream**
- 1/2 cup buttermilk**
- 1/3 cup lemon juice*, freshly squeezed
- 1 cup unsalted butter, softened
- 2 cups granulated sugar
- 1/4 cup lemon zest*
- 4 large eggs**, room temperature
- 2 teaspoons vanilla extract
Lemon Glaze
- 2 tablespoons fresh lemon juice*
- 1 – 1 1/2 cups powdered sugar, sifted
Instructions
Lemon Bundt Cake
-
Preheat the oven to 350°F (180°C) and set the oven rack to the middle position.
-
Generously grease and flour a 10-inch bundt pan, ensuring all creases and designs are coated to prevent sticking.
-
In a medium bowl, whisk together the sifted flour, baking powder, baking soda, and salt until well combined.
-
In a liquid measuring cup, whisk together the sour cream, buttermilk, and freshly squeezed lemon juice. A few small lumps are acceptable at this stage.
-
In a very large bowl, using an electric mixer, beat the softened butter, granulated sugar, and lemon zest on medium-high speed until light and fluffy (about 2-4 minutes).
-
Add the vanilla extract, then beat in the room temperature eggs one at a time, mixing well after each addition until just combined.
-
With the mixer on low speed, gradually beat in about 1/3 of the flour mixture, followed by about 1/3 of the buttermilk mixture. Turn off the mixer and scrape down the sides of the bowl.
-
Repeat the process twice more until all dry ingredients and buttermilk mixture are incorporated. Mix only until no streaks of flour remain, avoiding overmixing.
-
Spoon the batter evenly into the prepared bundt pan and smooth the top.
-
Bake in the preheated oven for 50-60 minutes, or until a wooden skewer or toothpick inserted into the center of the cake comes out clean.
-
Remove the pan from the oven and let the cake cool in the pan on a wire rack for 30 minutes. Then, carefully invert the cake onto the wire rack to cool completely before glazing.
Lemon Glaze
-
In a medium bowl, whisk together the fresh lemon juice and sifted powdered sugar until smooth.
-
The glaze should be opaque and thin enough to drizzle, but not watery. Adjust consistency by adding a little more powdered sugar (for thicker) or lemon juice (for thinner) as needed.
-
Once the cake is completely cooled, generously drizzle the lemon glaze over the top, allowing it to drip down the sides.
Notes
*You’ll need approximately 4-6 medium to large lemons for this entire recipe (for both cake and glaze).
**Ensure all cold ingredients (buttermilk, sour cream, eggs, butter) are at room temperature for optimal mixing and cake texture. You can speed up the process by gently warming buttermilk and sour cream in the microwave on very low power, and placing eggs in a bowl of warm water for 5-10 minutes.
Store leftover lemon bundt cake in an airtight container at room temperature for up to 4 days.
Freezing Instructions: Bake the cake as directed, but without the glaze, and cool completely. Wrap the cake tightly in plastic wrap at least twice, then place it in a large freezer-friendly container or bag. Freeze for up to 3 months. Thaw overnight in the refrigerator, then bring to room temperature before glazing and serving.
Nutrition Facts (per serving)
Calories: 523kcal, Carbohydrates: 84g, Protein: 6g, Fat: 19g, Saturated Fat: 11g, Cholesterol: 115mg, Sodium: 188mg, Potassium: 145mg, Fiber: 1g, Sugar: 59g, Vitamin A: 620IU, Vitamin C: 5.2mg, Calcium: 61mg, Iron: 1.9mg
★
Enjoyed this recipe? Please rate and comment below!