

Are you craving a dessert that’s as visually stunning as it is incredibly delicious? Look no further than these irresistible **Red Velvet Chocolate Chip Cookies**. These cookies perfectly blend the classic, subtly chocolatey flavor and vibrant crimson hue of traditional red velvet cake with the delightful chewiness of your favorite chocolate chip cookie. Each bite offers a harmonious balance of rich cocoa undertones and sweet white chocolate, creating a truly memorable treat.
Their striking red color makes them an ideal choice for special occasions like Valentine’s Day, Christmas, or any festive gathering where you want to add a touch of elegance and flavor. But honestly, you don’t need a special reason to whip up a batch of these soft, chewy wonders. They are perfect for satisfying any red velvet craving, any day of the year.
**This cherished recipe was originally shared in February 2016 and has been thoughtfully updated on January 6, 2020, with fresh photos, enhanced instructions, and additional baking insights to ensure your success.**

The Magic of Red Velvet Chocolate Chip Cookies
I have always been a devoted fan of all things red velvet, and these cookies are no exception. They strike the perfect balance between the refined elegance of a classic red velvet cake and the comforting, familiar chewiness of homemade chocolate chip cookies. This recipe is designed to deliver a premium cookie experience that stands out from the rest. Here’s what makes them truly special:
- A delicate hint of cocoa powder that provides the signature red velvet flavor without being overly chocolatey.
- A stunning, deep red color that captivates the eye and signals a delightful treat.
- An incredibly soft and perfectly chewy texture that melts in your mouth.
- Generous amounts of white chocolate chips, adding a creamy sweetness that beautifully complements the red velvet base. Feel free to use milk or dark chocolate chips if that’s your preference – these cookies are versatile!
What’s even better is that these exquisite cookies are made entirely from scratch. Despite their gourmet appearance and taste, the baking process is straightforward and no more complicated than preparing a standard batch of chocolate chip cookies. You’ll be amazed at how easily you can create such professional-looking and tasting treats right in your own kitchen.

Essential Ingredients for Perfect Red Velvet Cookies
Creating these delectable red velvet cookies starts with understanding the role of each ingredient. Let’s dive into what you’ll need and why each component is crucial for achieving that perfect soft, chewy texture and vibrant flavor.
- **All-Purpose Flour:** The primary structural component of our cookies. Ensure it’s measured correctly – too much flour can lead to dry, crumbly cookies, while too little can make them spread too much.
- **Cocoa Powder:** This is where the “chocolate” in red velvet comes from. We use just a hint to achieve that characteristic mild chocolate flavor that is distinct from a full chocolate cookie. Natural cocoa powder is recommended over Dutch-process cocoa for better interaction with the baking soda and a brighter red color.
- **Cornstarch:** The secret ingredient for extra soft cookies! Cornstarch helps tenderize the dough, giving the cookies a delightful, melt-in-your-mouth quality that keeps them soft for days.
- **Baking Soda:** Our leavening agent, working with the acidic ingredients (like cocoa powder and sometimes buttermilk, though not in this specific recipe) to create lift and a tender crumb.
- **Salt:** A flavor enhancer that balances the sweetness and brings out the depth of the cocoa and vanilla.
- **Unsalted Butter:** Real butter is key for flavor and richness. Make sure it’s softened to room temperature for optimal creaming with the sugars, which incorporates air and creates a light, fluffy base.
- **Brown Sugar & White Sugar:** The combination of sugars is important for texture. Brown sugar adds moisture, contributing to the chewy texture and a deeper, molasses-like flavor. White granulated sugar helps with crisp edges and overall sweetness.
- **Large Egg:** Provides structure, moisture, and tenderness. Ensure it’s also at room temperature to blend seamlessly with the butter mixture.
- **Vanilla Extract:** Enhances all the other flavors, adding a warm, aromatic note that is essential to any great cookie.
- **Red Food Coloring (Liquid or Gel):** This is what gives red velvet its iconic color! Gel food coloring is often more concentrated, so you might use a little less for the same vibrancy compared to liquid. I personally find 3 teaspoons of liquid coloring gives the bright, appealing color seen in the photos.
- **White Chocolate Chips:** These are folded in at the end, providing creamy pockets of sweetness. You can easily substitute with milk, semi-sweet, or dark chocolate chips, or even a mix, depending on your preference.
Step-by-Step Guide to Baking Irresistible Red Velvet Cookies
Let’s get those mixing bowls ready! Baking these vibrant red velvet cookies is a joyous process, and following these steps will ensure perfect results every time.
- **Prepare Your Dry Ingredients:** In a large bowl, meticulously whisk together the all-purpose flour, cocoa powder, cornstarch, baking soda, and salt. Whisking ensures these ingredients are evenly distributed, which is crucial for uniform texture and rise in your cookies. Set this bowl aside.
- **Cream Butter and Sugars:** In a separate, even larger mixing bowl, using an electric mixer, beat the softened unsalted butter with both brown sugar and white granulated sugar. Continue to beat until the mixture becomes light, fluffy, and noticeably pale in color. This step is vital for incorporating air, which contributes to the cookies’ soft texture.
- **Add Wet Ingredients:** Next, beat in the large egg and vanilla extract until fully combined. Then, introduce the red food coloring. Start with 2 teaspoons and add up to 3 teaspoons, or more if using liquid food coloring, until you achieve your desired vibrant red hue. Mix until the color is uniformly distributed throughout the butter mixture.
- **Combine Wet and Dry:** With your mixer on a low speed, gradually add the dry ingredient mixture to the wet ingredients, about half at a time. Mix only until just combined, being careful not to overmix. Overmixing can develop the gluten in the flour too much, leading to tough cookies.
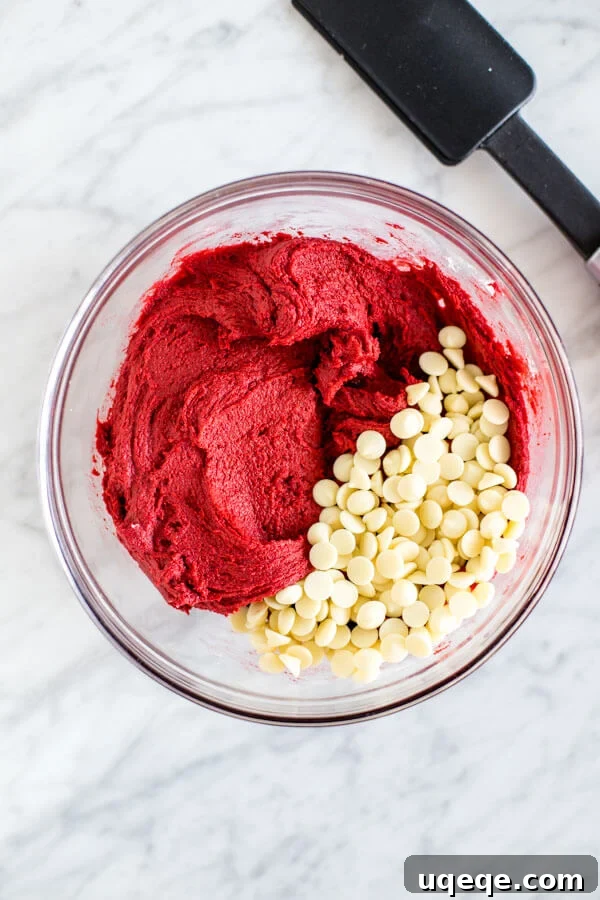
- **Fold in Chocolate Chips:** Turn off the mixer and gently stir in the white chocolate chips using a spatula. Make sure they are evenly distributed throughout the beautiful red dough.
- **Chill the Dough – A Crucial Step:** This step is non-negotiable for these red velvet cookies. Due to the addition of red food coloring, the dough is naturally softer than standard cookie dough. Chilling the dough covered in the refrigerator for at least 3 hours (and up to 24 hours) is 100% necessary. This allows the butter to firm up and the flavors to meld, significantly reducing spreading during baking and ensuring your cookies turn out thick, chewy, and perfectly formed.
- **Prepare for Baking:** Once the dough is properly chilled and you’re ready to bake, preheat your oven to 350°F (175°C). Line two baking sheets with parchment paper or silicone baking mats. This prevents sticking and promotes even baking.
- **Form the Cookies:** Using a cookie scoop (approximately 1 to 1.5 tablespoon in size) is highly recommended. Not only does it help you create uniform cookie balls, but it also prevents your fingers from getting stained by the red food coloring. Place the dough balls about 2 inches apart on the prepared baking sheets. If your chilled dough feels too hard to scoop, let the bowl sit at room temperature for 10-20 minutes to soften slightly.
- **Bake to Perfection:** Bake one cookie sheet at a time on the middle rack of your preheated oven for 7-9 minutes. The cookies are done when their edges are lightly golden and the tops look just set but still slightly soft in the center. Remember, they will continue to bake slightly as they cool on the hot baking sheet.
- **Cool and Garnish:** Remove the cookies from the oven. For that irresistible “eat me” look, immediately place a few extra white chocolate chips on top of each warm cookie – they’ll melt beautifully into the surface. Let the cookies cool on the baking sheet for 10 minutes to finish setting before carefully transferring them to a wire rack to cool completely.
And there you have it! A batch of gorgeous, delicious, and perfectly soft and chewy red velvet chocolate chip cookies ready to be enjoyed.
Expert Tips for Flawless Red Velvet Chocolate Chip Cookies
Achieving cookie perfection is all about the details. Here are some invaluable tips and tricks to ensure your red velvet chocolate chip cookies are nothing short of spectacular:
- **Dough Consistency Adjustment:** If, after combining all ingredients, your dough feels particularly sticky or wet, stir in an additional tablespoon of all-purpose flour. This small adjustment can make a big difference in handling and preventing excessive spreading.
- **Handling Chilled Dough:** If your dough becomes excessively hard after chilling (which can happen, especially if refrigerated for an extended period), simply let the bowl sit at room temperature for 10-15 minutes before attempting to scoop and form the balls. It will soften just enough to be manageable.
- **The Cookie Scoop Advantage:** As mentioned, a cookie scoop is your best friend here. It ensures uniform cookie size, leading to even baking, and keeps your hands clean from the vibrant red coloring.
- **The “Eat Me” Look:** This is a simple but effective trick for presentation. As soon as the cookies come out of the oven, while they are still warm and soft, gently press a few extra white chocolate chips onto the tops of each cookie. They will melt slightly, creating that appealing, professional finish.
- **Underbake for Softness:** For truly soft and chewy cookies, resist the urge to overbake. Take them out of the oven when the edges are just set and the centers still look slightly soft or even a little underdone. The residual heat from the baking sheet will continue to cook them as they cool, resulting in that coveted tender interior.
- **Doubling the Recipe:** This recipe is incredibly easy to scale up! If you’re baking for a crowd or want to stock your freezer, simply double all the ingredient quantities to yield approximately 40-44 delicious cookies.
- **Ingredient Temperature Matters:** Ensure your butter and egg are at room temperature. Room temperature ingredients emulsify better, creating a smoother, more uniform dough, which translates to a better cookie texture.
- **Measure Flour Correctly:** Avoid scooping flour directly from the bag with your measuring cup, as this compacts it and results in too much flour. Instead, fluff the flour with a spoon, then spoon it into your measuring cup, and level off the top with a straight edge.
- **Parchment Paper vs. Silicone Mats:** Both are excellent for preventing sticking. Parchment paper is single-use, while silicone baking mats are reusable and provide a slightly softer cookie bottom. Choose what you prefer!
- **Oven Calibration:** Ovens can vary. If your cookies aren’t baking as expected, consider getting an oven thermometer to ensure your oven is truly heating to the temperature you set.
Why These Red Velvet Cookies Are a Must-Try!
These Red Velvet Chocolate Chip Cookies aren’t just another dessert; they’re an experience. Their striking appearance alone makes them a conversation starter, while their incredible flavor ensures they’ll be devoured quickly. They offer the sophisticated taste of red velvet in a comforting, handheld format, making them versatile for any occasion. Whether you’re hosting a holiday party, preparing a special treat for loved ones, or simply indulging in a personal craving, these cookies deliver on all fronts. They are relatively easy to make from scratch, offering a rewarding baking project that yields impressive results. Get ready to impress everyone with these vibrant, soft, and utterly delightful cookies!

Frequently Asked Questions (FAQ) about Red Velvet Cookies
- What gives red velvet its unique flavor?
- Red velvet is characterized by a mild cocoa flavor, often complemented by a hint of tanginess from buttermilk (though not in this specific cookie recipe, the cocoa still provides that classic subtle chocolate note). The vibrant red color is achieved through food coloring, which is a signature visual element.
- Can I use other types of chocolate chips?
- Absolutely! While white chocolate chips are traditionally paired with red velvet for a striking contrast and creamy sweetness, feel free to use semi-sweet, milk, or even dark chocolate chips. Chocolate chunks or chopped nuts could also be delicious variations.
- Why is chilling the dough so important?
- Chilling the dough is crucial for several reasons. It allows the butter to firm up, preventing the cookies from spreading too much in the oven, resulting in thicker, chewier cookies. It also allows the flour to fully hydrate and the flavors to deepen, leading to a more tender and flavorful cookie.
- How should I store these red velvet cookies?
- Store the baked cookies in an airtight container at room temperature for up to 4 days. For optimal freshness, ensure they are completely cooled before storing.
- Can I freeze red velvet cookie dough or baked cookies?
- Yes, both can be frozen! To freeze cookie dough, scoop the dough into balls and place them on a parchment-lined baking sheet. Freeze until solid, then transfer the frozen dough balls to a freezer-safe bag or container for up to 2 months. When ready to bake, place frozen dough balls on a lined baking sheet and bake for an extra 1-2 minutes. To freeze baked cookies, ensure they are completely cool, then place them in a single layer in an airtight freezer-safe container, separating layers with parchment paper. They can be frozen for up to 1 month. Thaw at room temperature before serving.
More Delicious Red Velvet Recipes to Explore
If these red velvet chocolate chip cookies have ignited your passion for this classic flavor, you’re in luck! There are many more delightful red velvet treats to explore, whether you need to save time or want to dive deeper into from-scratch baking.
- For a quick and easy option when you’re short on time, try these fantastic Red Velvet Cake Mix Cookies.
- If you adore sandwich cookies, our Red Velvet Sandwich Cookies are like a soft, chewy red velvet version of an Oreo – utterly addictive!
- No red velvet collection is complete without the classic, moist, and fluffy Red Velvet Cupcakes, topped with a luscious cream cheese frosting.
- And of course, for the ultimate indulgence, our Easy Red Velvet Cake is a must-try, perfect for any celebration.
Red Velvet Chocolate Chip Cookies Recipe
By: Fiona Dowling
These red velvet chocolate chip cookies boast an incredible red velvet flavor, loaded with creamy white chocolate chips. They bake up incredibly soft and chewy, featuring a striking red color that makes them perfect for festive occasions like Valentine’s Day and Christmas, or simply to satisfy your red velvet cravings anytime.

Prep Time: 15 mins
Cook Time: 8 mins
Chilling Time: 3 hrs
Total Time: 3 hrs 26 mins
Servings: 22 cookies
Ingredients
- 1 1/2 cups all-purpose flour (aka plain flour)
- 2 tablespoons cocoa powder (natural, unsweetened)
- 1 1/2 teaspoons cornstarch
- 1/2 teaspoon baking soda
- 1/4 teaspoon salt
- 1/2 cup unsalted butter, softened to room temperature
- 1/3 cup brown sugar, lightly packed
- 1/2 cup white sugar
- 1 large egg, at room temperature
- 1 teaspoon vanilla extract
- 2-3 teaspoons red food coloring (liquid or gel, adjust for desired vibrancy)
- 3/4 cup white chocolate chips (plus extra for garnish, optional)
Instructions
- In a large bowl, whisk together the all-purpose flour, cocoa powder, cornstarch, baking soda, and salt. Set aside.
- In a separate large bowl, using an electric mixer, beat the softened butter and both sugars together until the mixture is light and fluffy, about 2-3 minutes.
- Beat in the egg and vanilla extract until well combined. Then, add the red food coloring and mix until the color is evenly distributed throughout the dough.
- With the mixer on low speed, gradually add the dry flour mixture to the wet ingredients, about half at a time. Mix just until combined and no dry streaks of flour remain. Be careful not to overmix.
- Turn off the mixer and gently fold in the white chocolate chips using a spatula.
- Cover the bowl with plastic wrap and refrigerate the cookie dough for at least 3 hours, or preferably overnight, to allow it to firm up and flavors to develop.
- When you’re ready to bake, preheat your oven to 350°F (175°C). Line two baking sheets with parchment paper or silicone baking mats.
- Using a cookie scoop (approximately 1 to 1.5 tablespoons in size), form the chilled dough into balls and place them about 2 inches apart on the prepared baking sheets. If the dough is too firm, let it sit on the counter for 10-20 minutes before scooping.
- Bake one cookie sheet at a time on the middle rack of the oven for 7-9 minutes, or until the edges are lightly set and the tops appear mostly baked but still look soft in the center.
- Remove from the oven. Optionally, immediately press a few extra white chocolate chips onto the tops of each warm cookie for an enhanced appearance. Let the cookies cool on the baking sheet for 10 minutes before transferring them to a wire rack to cool completely.
Notes
- Store these delicious cookies in an airtight container at room temperature for up to 4 days for optimal freshness.
- The total recipe time includes the necessary 3 hours of dough chilling.
- **Make-Ahead Tips:** To freeze cookie dough, prepare the dough up to step 6. Then, scoop the dough into balls and arrange them on a freezer-safe tray. Once frozen solid, transfer the dough balls to a freezer bag, remove as much air as possible, and seal. Freeze for up to 2 months. When ready to bake, simply place the frozen cookie dough balls on a lined baking sheet and bake for 8-10 minutes at 350°F (175°C), which is typically 1-2 minutes longer than baking with un-frozen dough.
Nutrition (per serving)
Calories: 137kcal, Carbohydrates: 18g, Protein: 2g, Fat: 7g, Saturated Fat: 4g, Cholesterol: 22mg, Sodium: 62mg, Potassium: 42mg, Fiber: 1g, Sugar: 11g, Vitamin A: 143IU, Calcium: 20mg, Iron: 1mg
We hope you enjoy baking and sharing these delightful Red Velvet Chocolate Chip Cookies as much as we do! If you loved this recipe, please consider leaving a rating and a comment below to share your experience. Happy baking!